
ブランチデプロイモデル
Githubのmainブランチにマージをした後にデプロイをするマージデプロイモデルではなく、プルリクエスト上でデプロイを完了してからマージするブランチデプロイモデルを解説します。
PullRequest上のコマンドでGithub Actionsを動作させる
Branchデプロイモデルと聞くと「新しい概念が出現した」みたいな身構えてしまうかもしれない。しかし、BranchデプロイモデルはただGithub ActionsをPull Requestのコメントで起動することができる機能です。
そのため、Pull Request上で自由に事前に設定しておいたCICD Workflowを実行できます。
その際に、環境を指定してCICDを実行したり、CICDをロックして他のエンジニアが同時にリリースをすることがないように自由に設定が可能です。
一つずつ見ていく。
Pull Request上でコメントを追加して、Github Actionsを起動する
まずは、Pull Request上にコメントをしてGithub Actionsを起動するソースコードを書いていきます。
.github/workflowsディレクトリ配下にYAMLファイルを作成すれば、自動でGithub ActionsのワークフローファイルだとGithubに認識されるので、このディレクトリ配下にファイルを作成します。
demo.yml
name: Demo

# The workflow to execute on is comments that are newly created
on:
  issue_comment:
    types: [created]

# Permissions needed for reacting and adding comments for IssueOps commands
permissions:
  pull-requests: write
  deployments: write
  contents: write
  checks: read

jobs:
  demo:
    runs-on: ubuntu-latest
    steps:
      - name: branch-deploy
        id: branch-deploy
        uses: github/[email protected]

      - name: Test Run
        run: echo "test run"
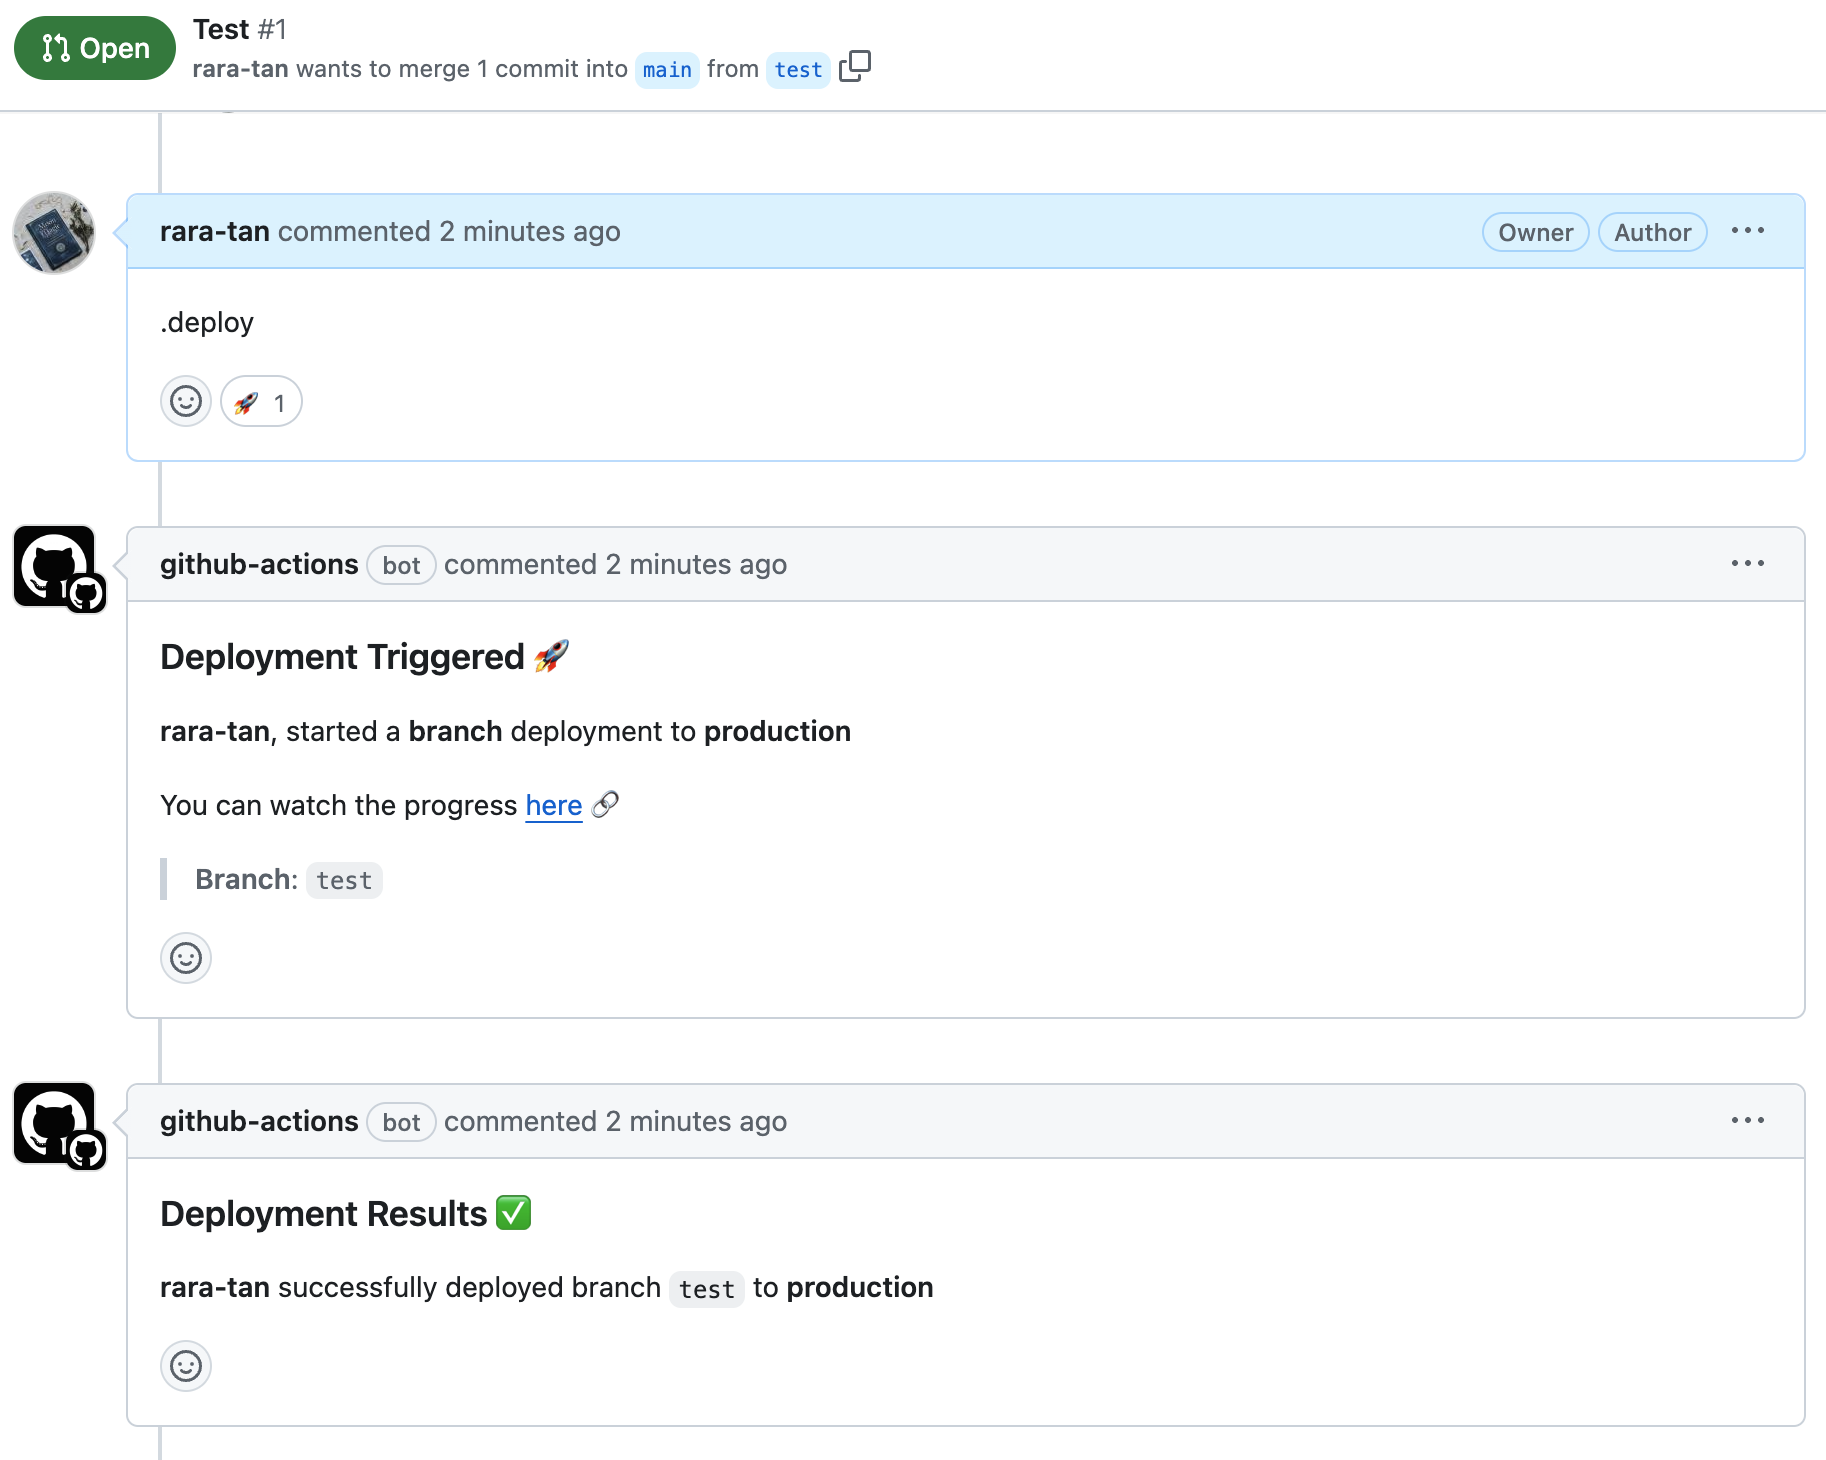
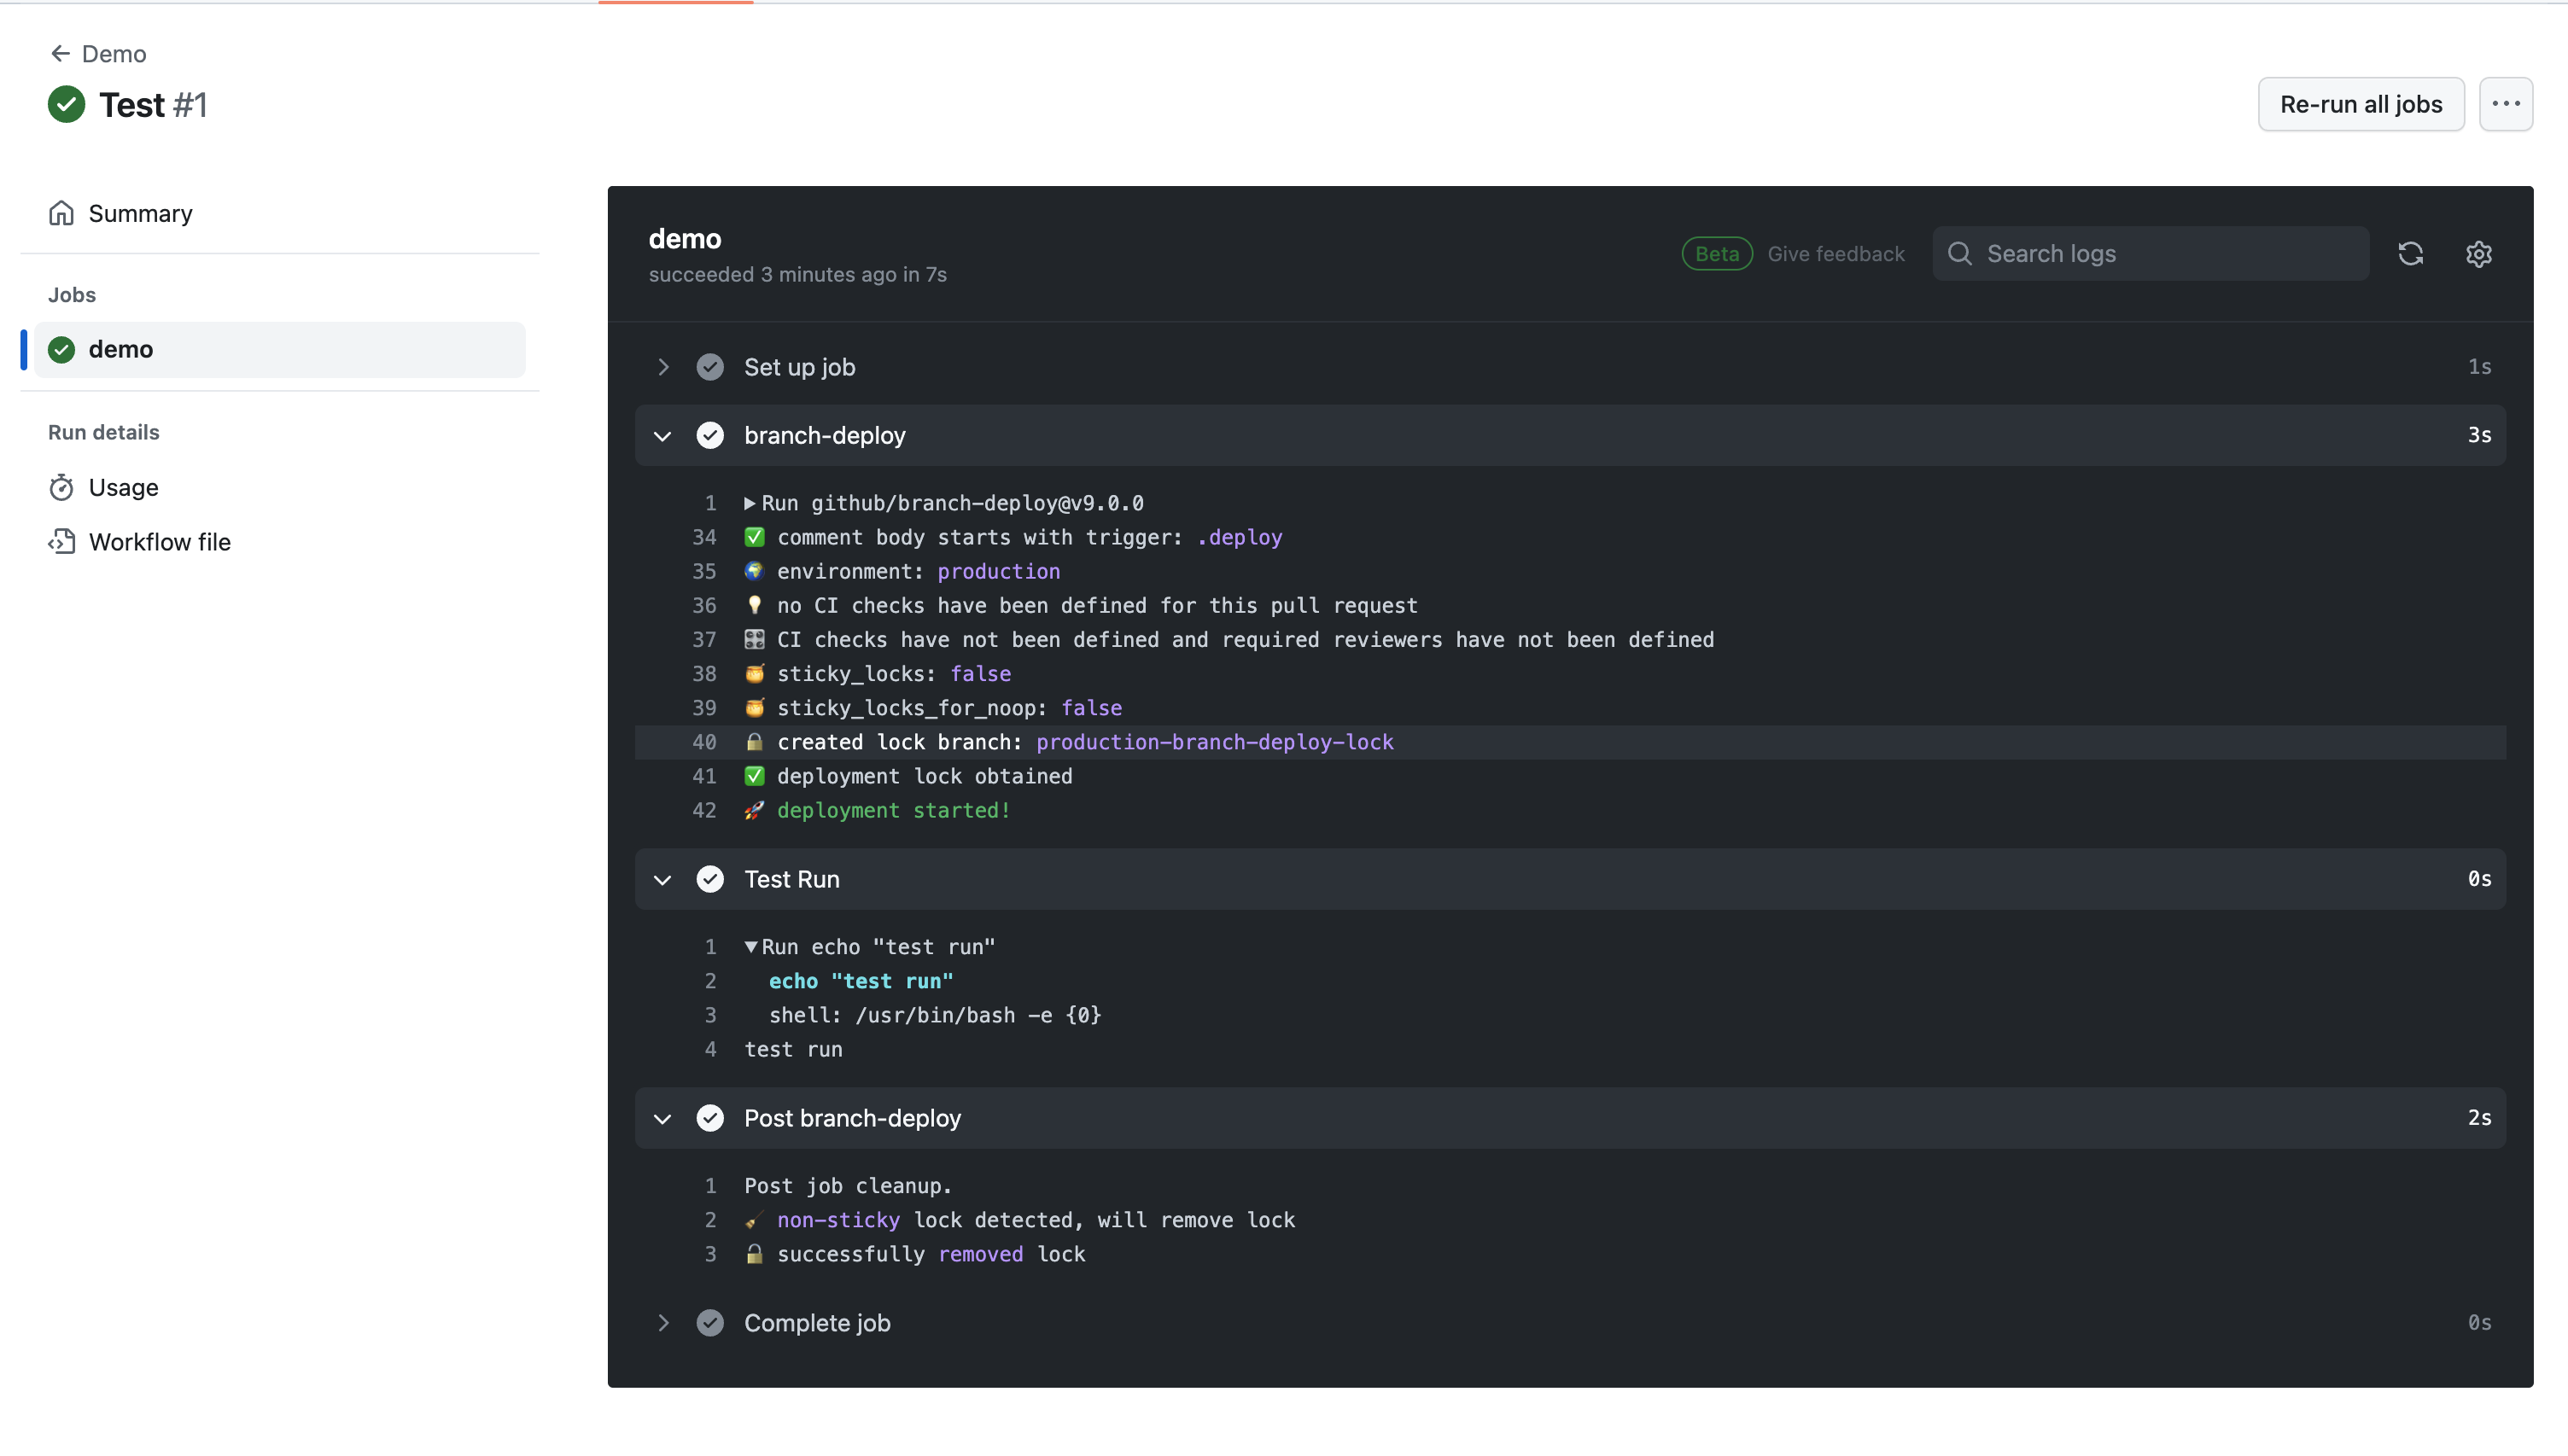
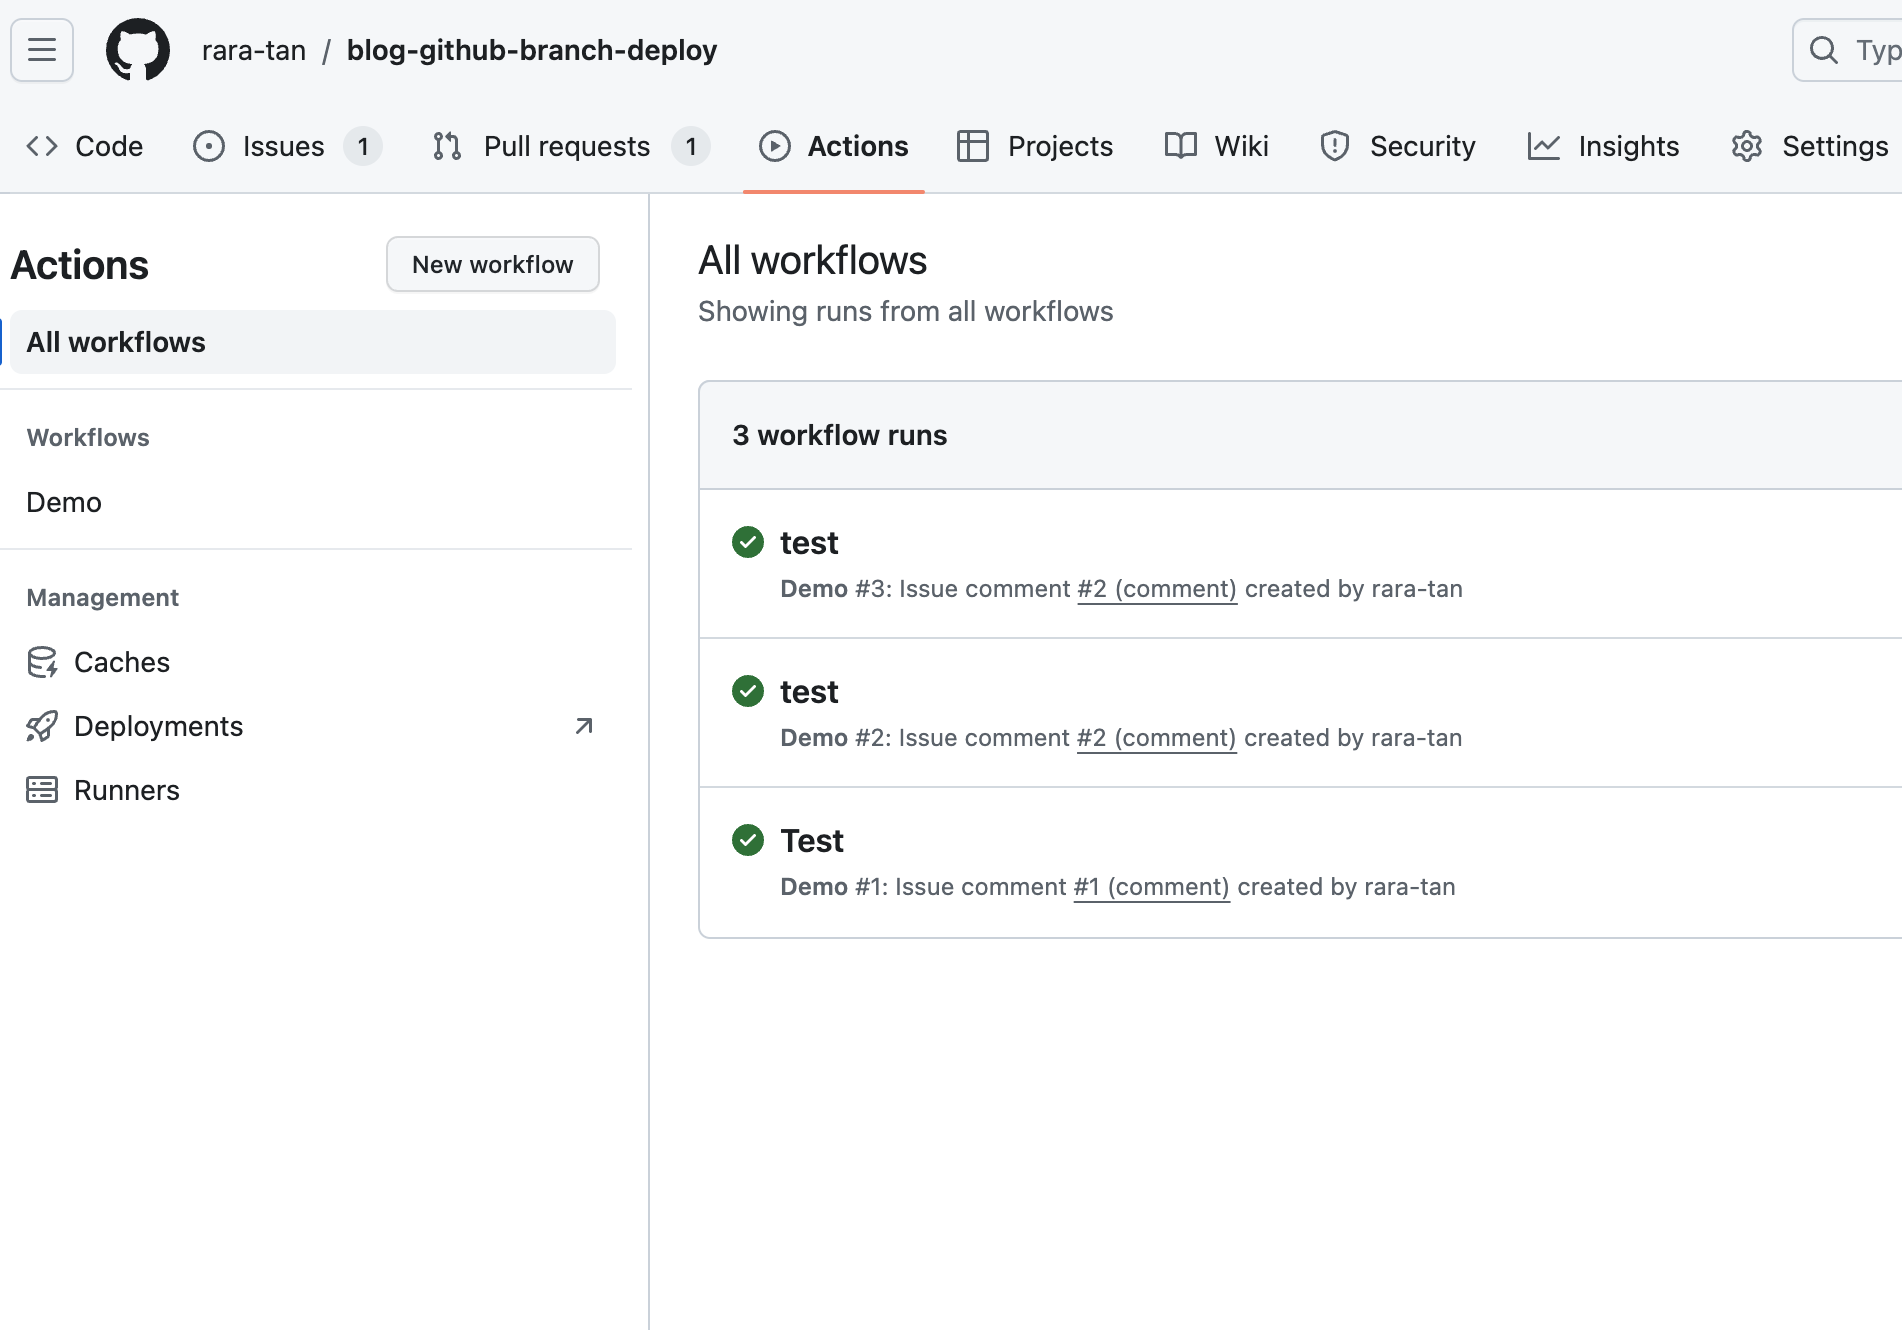
まずはこのようなYAMLファイルで実験をしてみました。
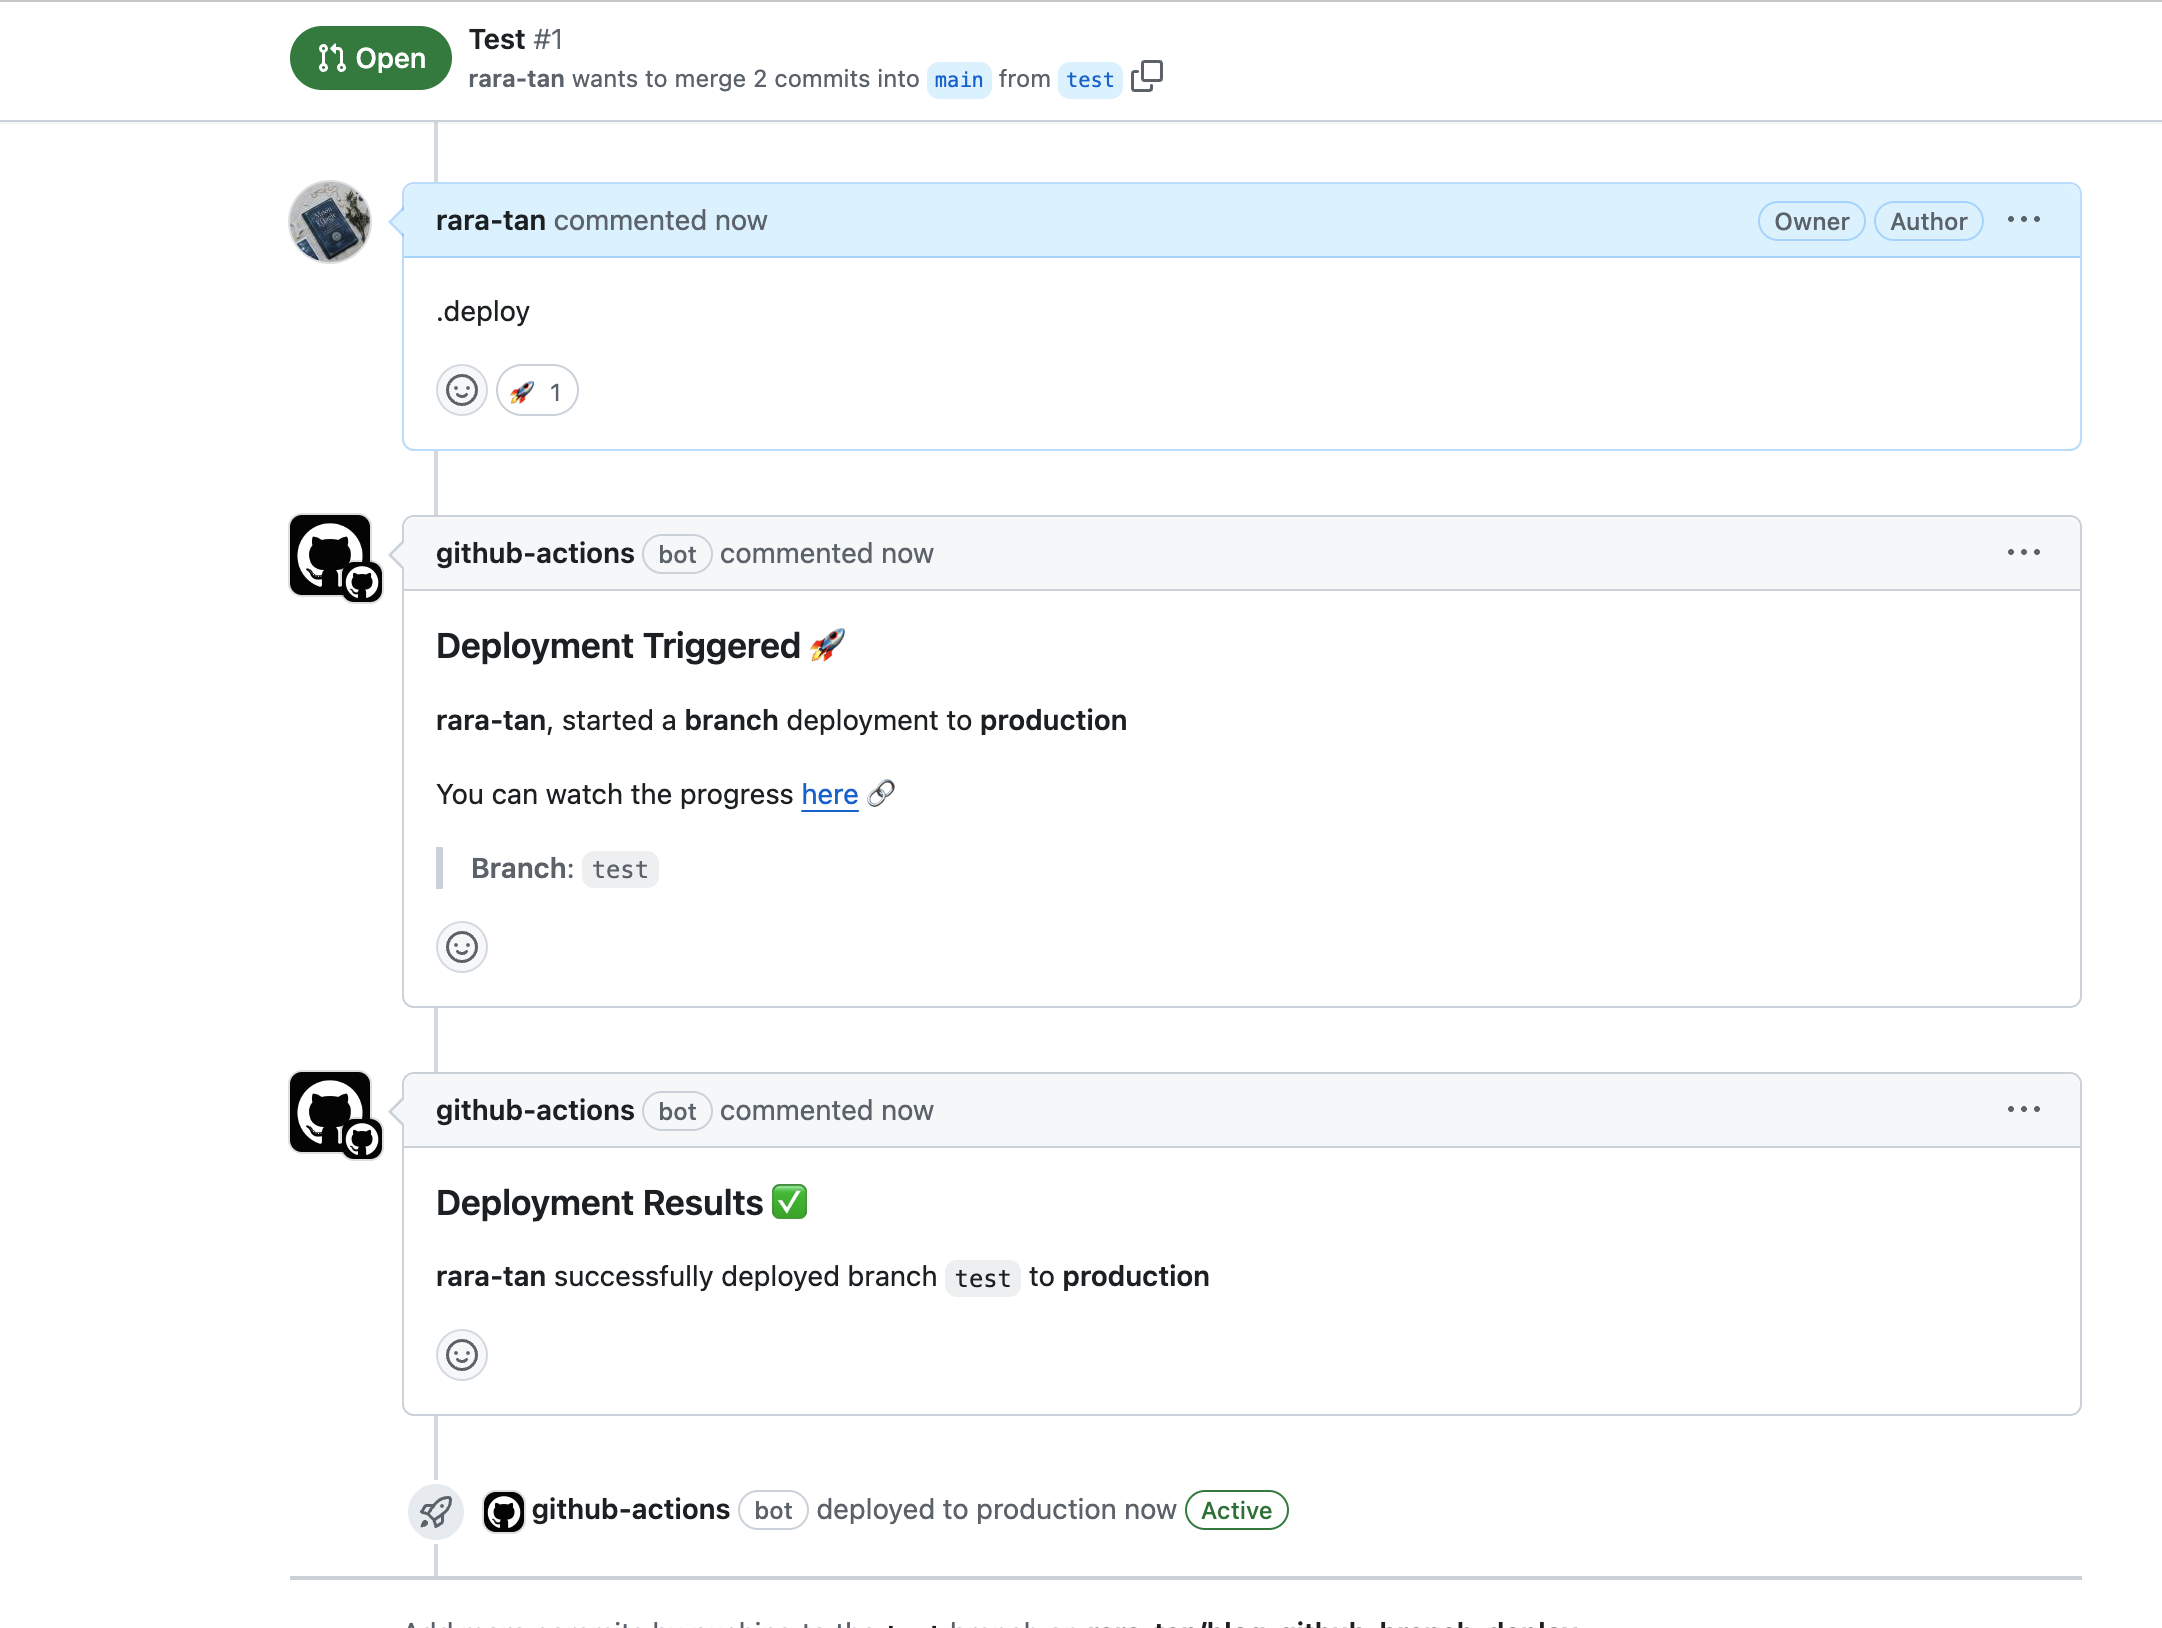
このファイルをGithubにPushし、適当にPRリクエストを作成して、.deployコマンドを実行してみます。
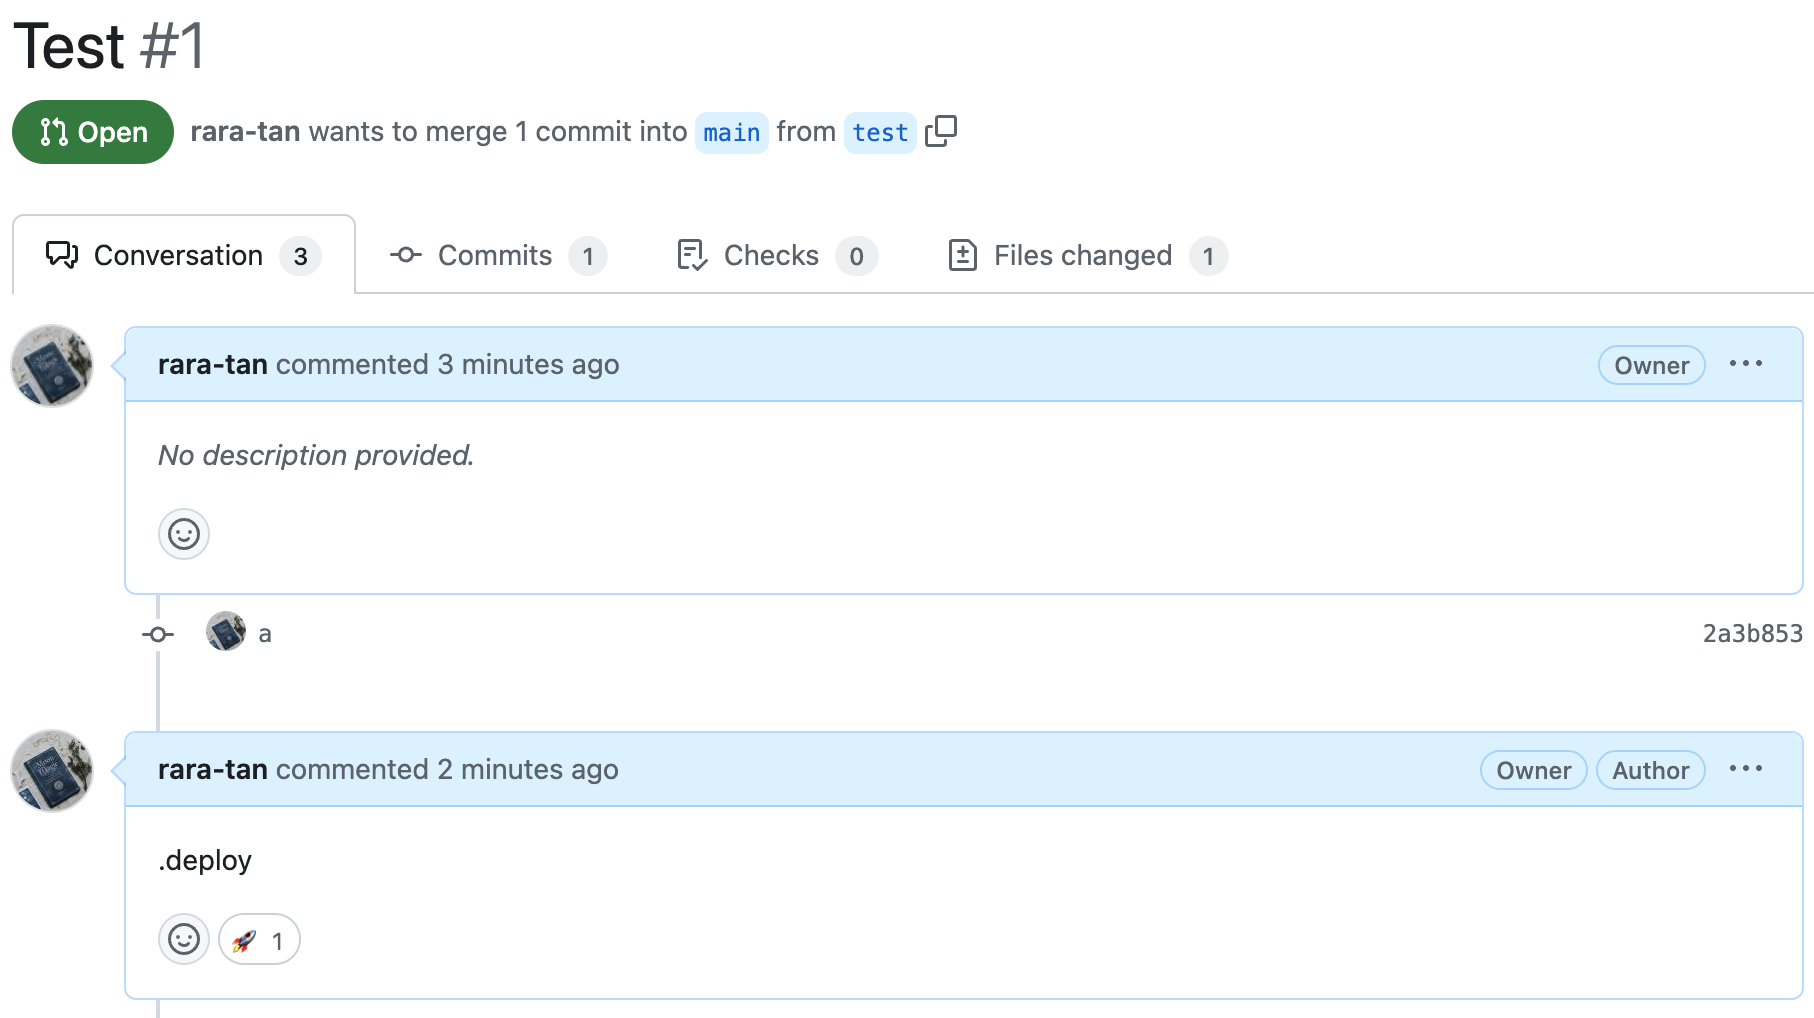
すると、以下のようにGithub Actionsが実行されました。
PRからのみトリガーできるようにする
このGithub ActionsのワークフローはIssueからでも実行が可能です。
以下のように、Github Issueを作成し、その中で.deployとコメントをすると同じGithub Actionsが実行されます。
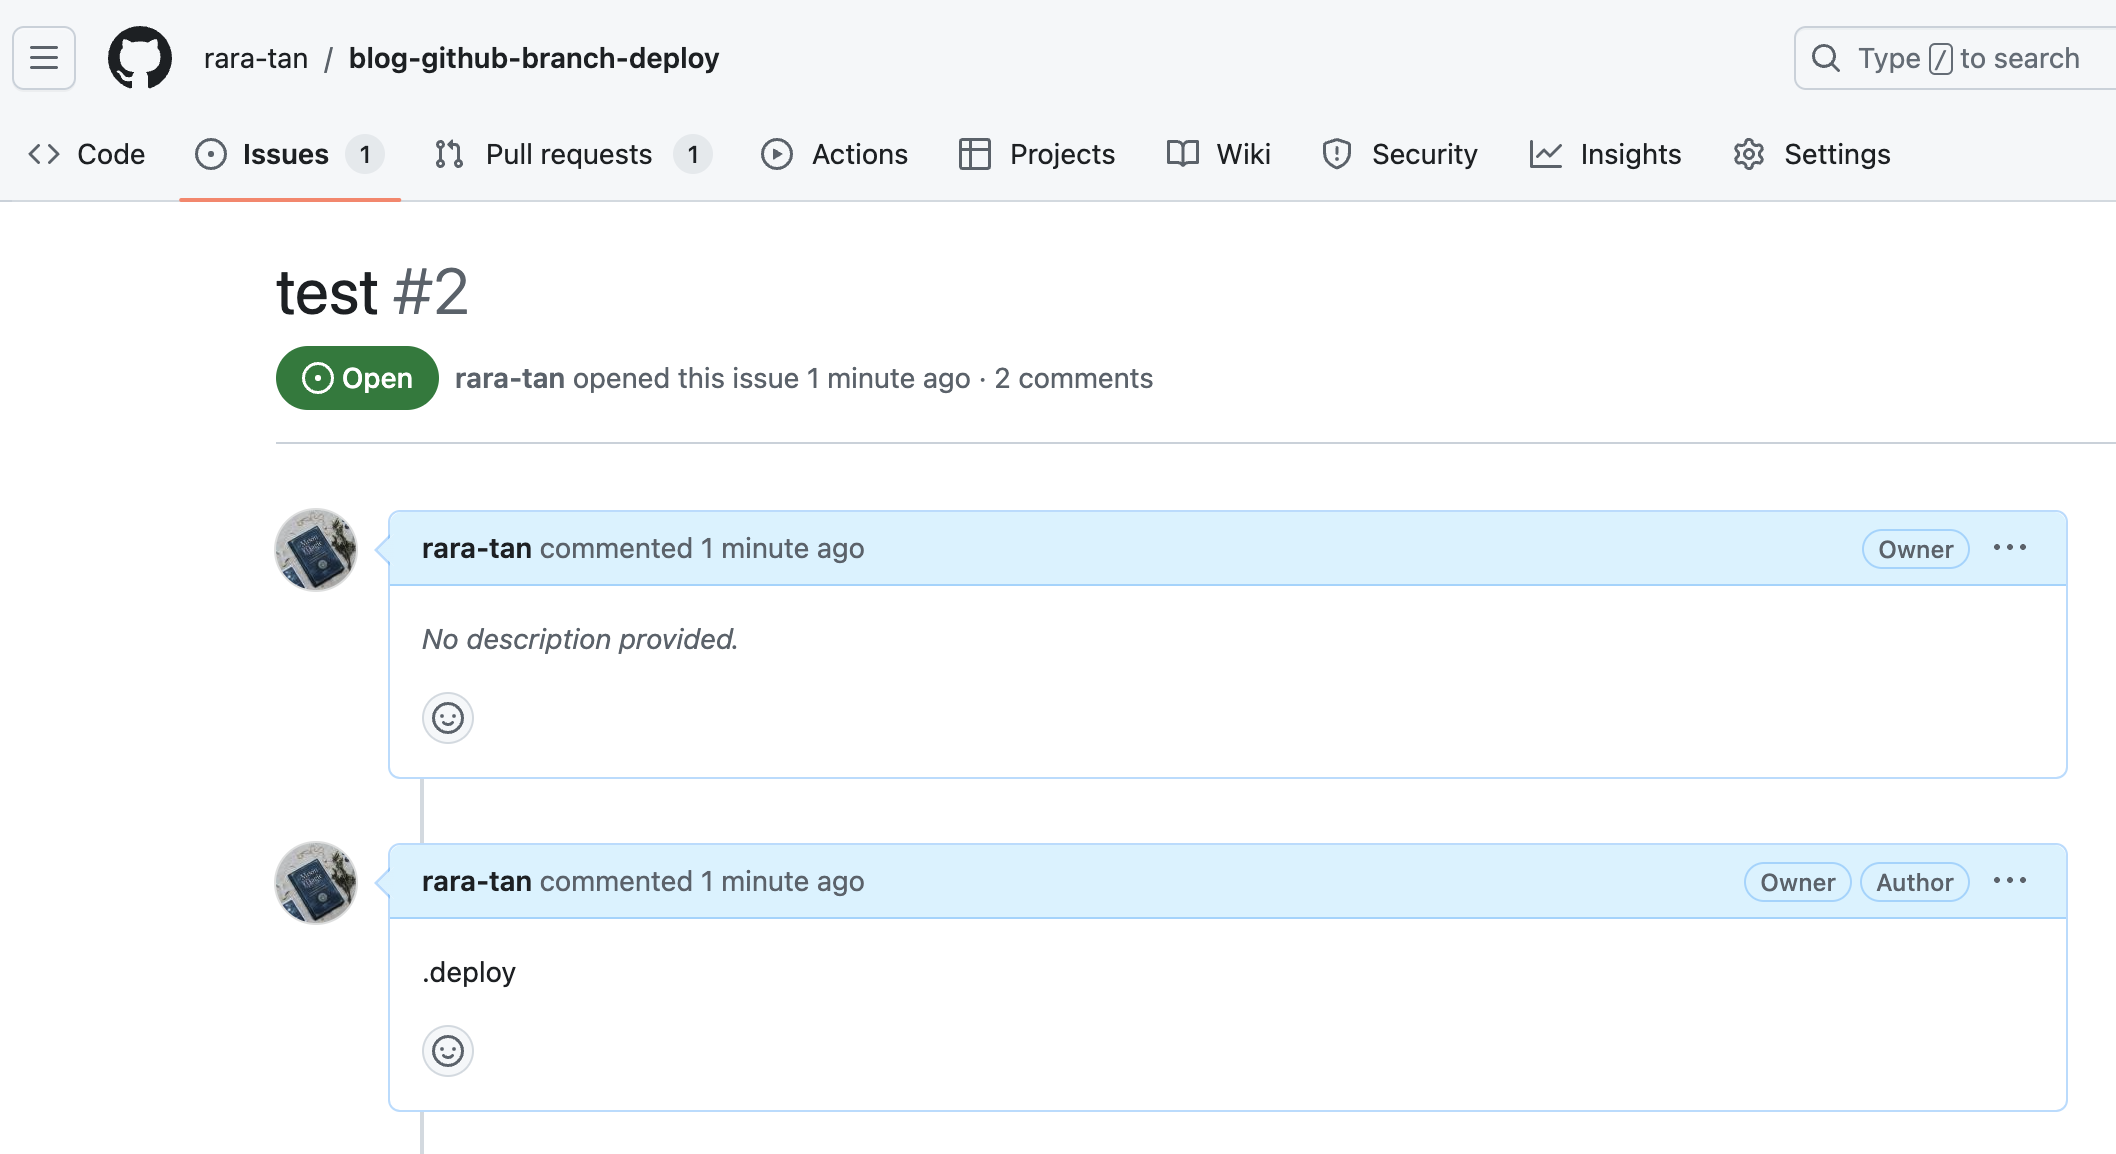
issueから実行できるのは便利に見えますが、リリース用のWorkflowをPR以外の場所からトリガーできてしまうのは危険です。
そのため、Pull Reqestからのみワークフローを実行できるようにif文を追加します。
demo.yml
name: Demo

# The workflow to execute on is comments that are newly created
on:
  issue_comment:
    types: [created]

# Permissions needed for reacting and adding comments for IssueOps commands
permissions:
  pull-requests: write
  deployments: write
  contents: write
  checks: read

jobs:
  demo:
    # ここを追加
    if: ${{ github.event.issue.pull_request }}
    runs-on: ubuntu-latest
    steps:
      - name: branch-deploy
        id: branch-deploy
        uses: github/[email protected]

      - name: Test Run
        run: echo "test run"
if文を追加したおかげで、Issueの中で再度.deployとコメントをしてもWorkflowがSkipされるようになりました。
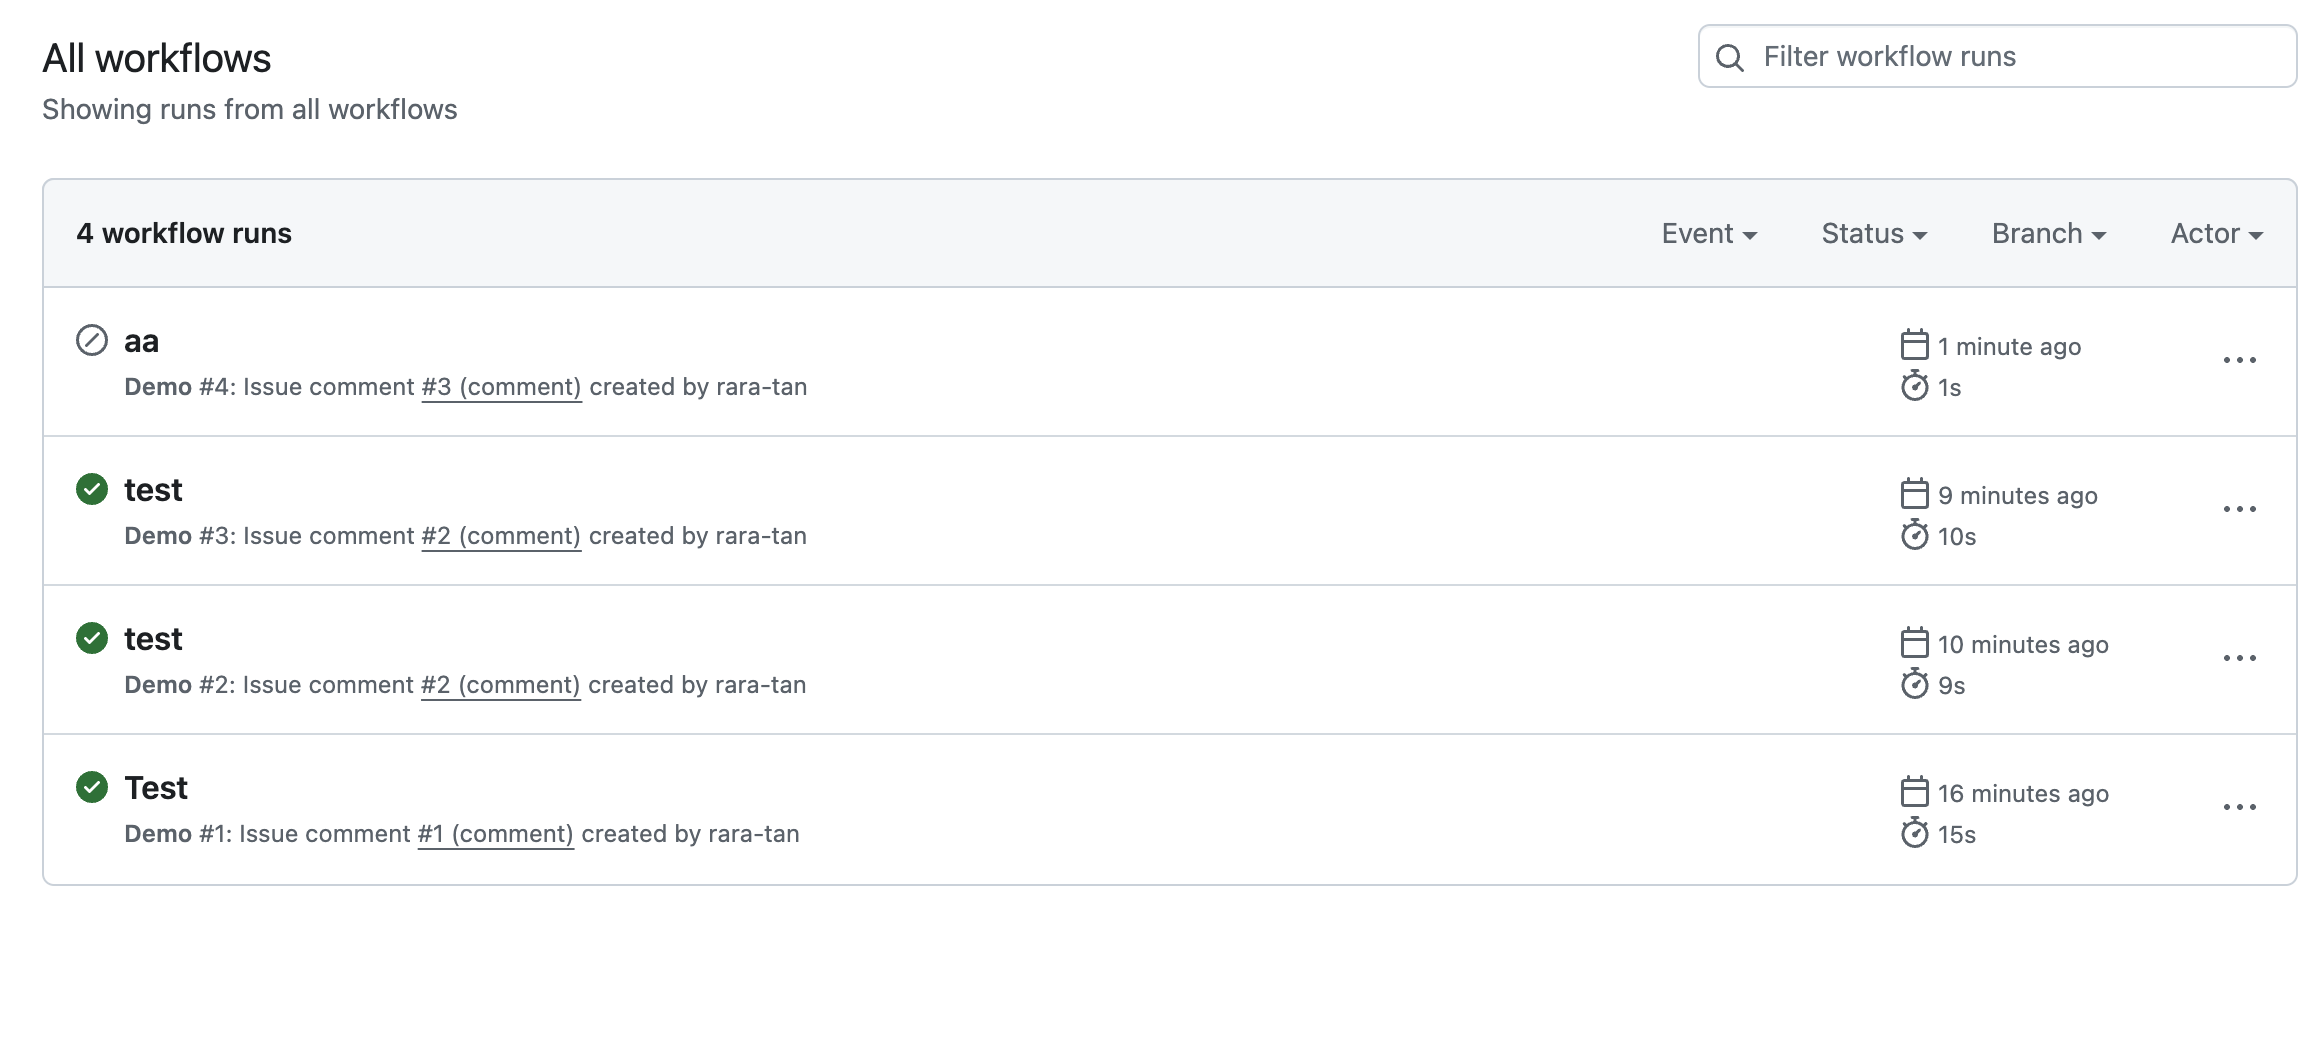
※一番上のaaというワークフローが無視されている。
noop deployを実装する
次にnoop deployを実装します。
noopとはNo Operaionの訳で、何も実行をしないさいに使われるオペレーションです。
例えば、Terraform Planのような実行をしたとしても環境には変更がないようなオペレーションが該当します。
先ほど作成したdemo.ymlファイルにnoop deployを実装していきます。
demo.yml
name: Demo

# The workflow to execute on is comments that are newly created
on:
  issue_comment:
    types: [created]

# Permissions needed for reacting and adding comments for IssueOps commands
permissions:
  pull-requests: write
  deployments: write
  contents: write
  checks: read

jobs:
  demo:
    if: ${{ github.event.issue.pull_request }}
    runs-on: ubuntu-latest
    steps:
      - name: branch-deploy
        id: branch-deploy
        uses: github/[email protected]

      - name: Test Run
        run: echo "test run"

      - name: Noop Deploy
        if: ${{ steps.branch-deploy.outputs.continue == 'true' && steps.branch-deploy.outputs.noop == 'true' }}
        run: echo "Noop Deploy!"
一番最後のステップとしてNoop Deployを追加しました。このStepを追加したWorkflowをGithubに追加した後、.noopというコマンドを実行します。
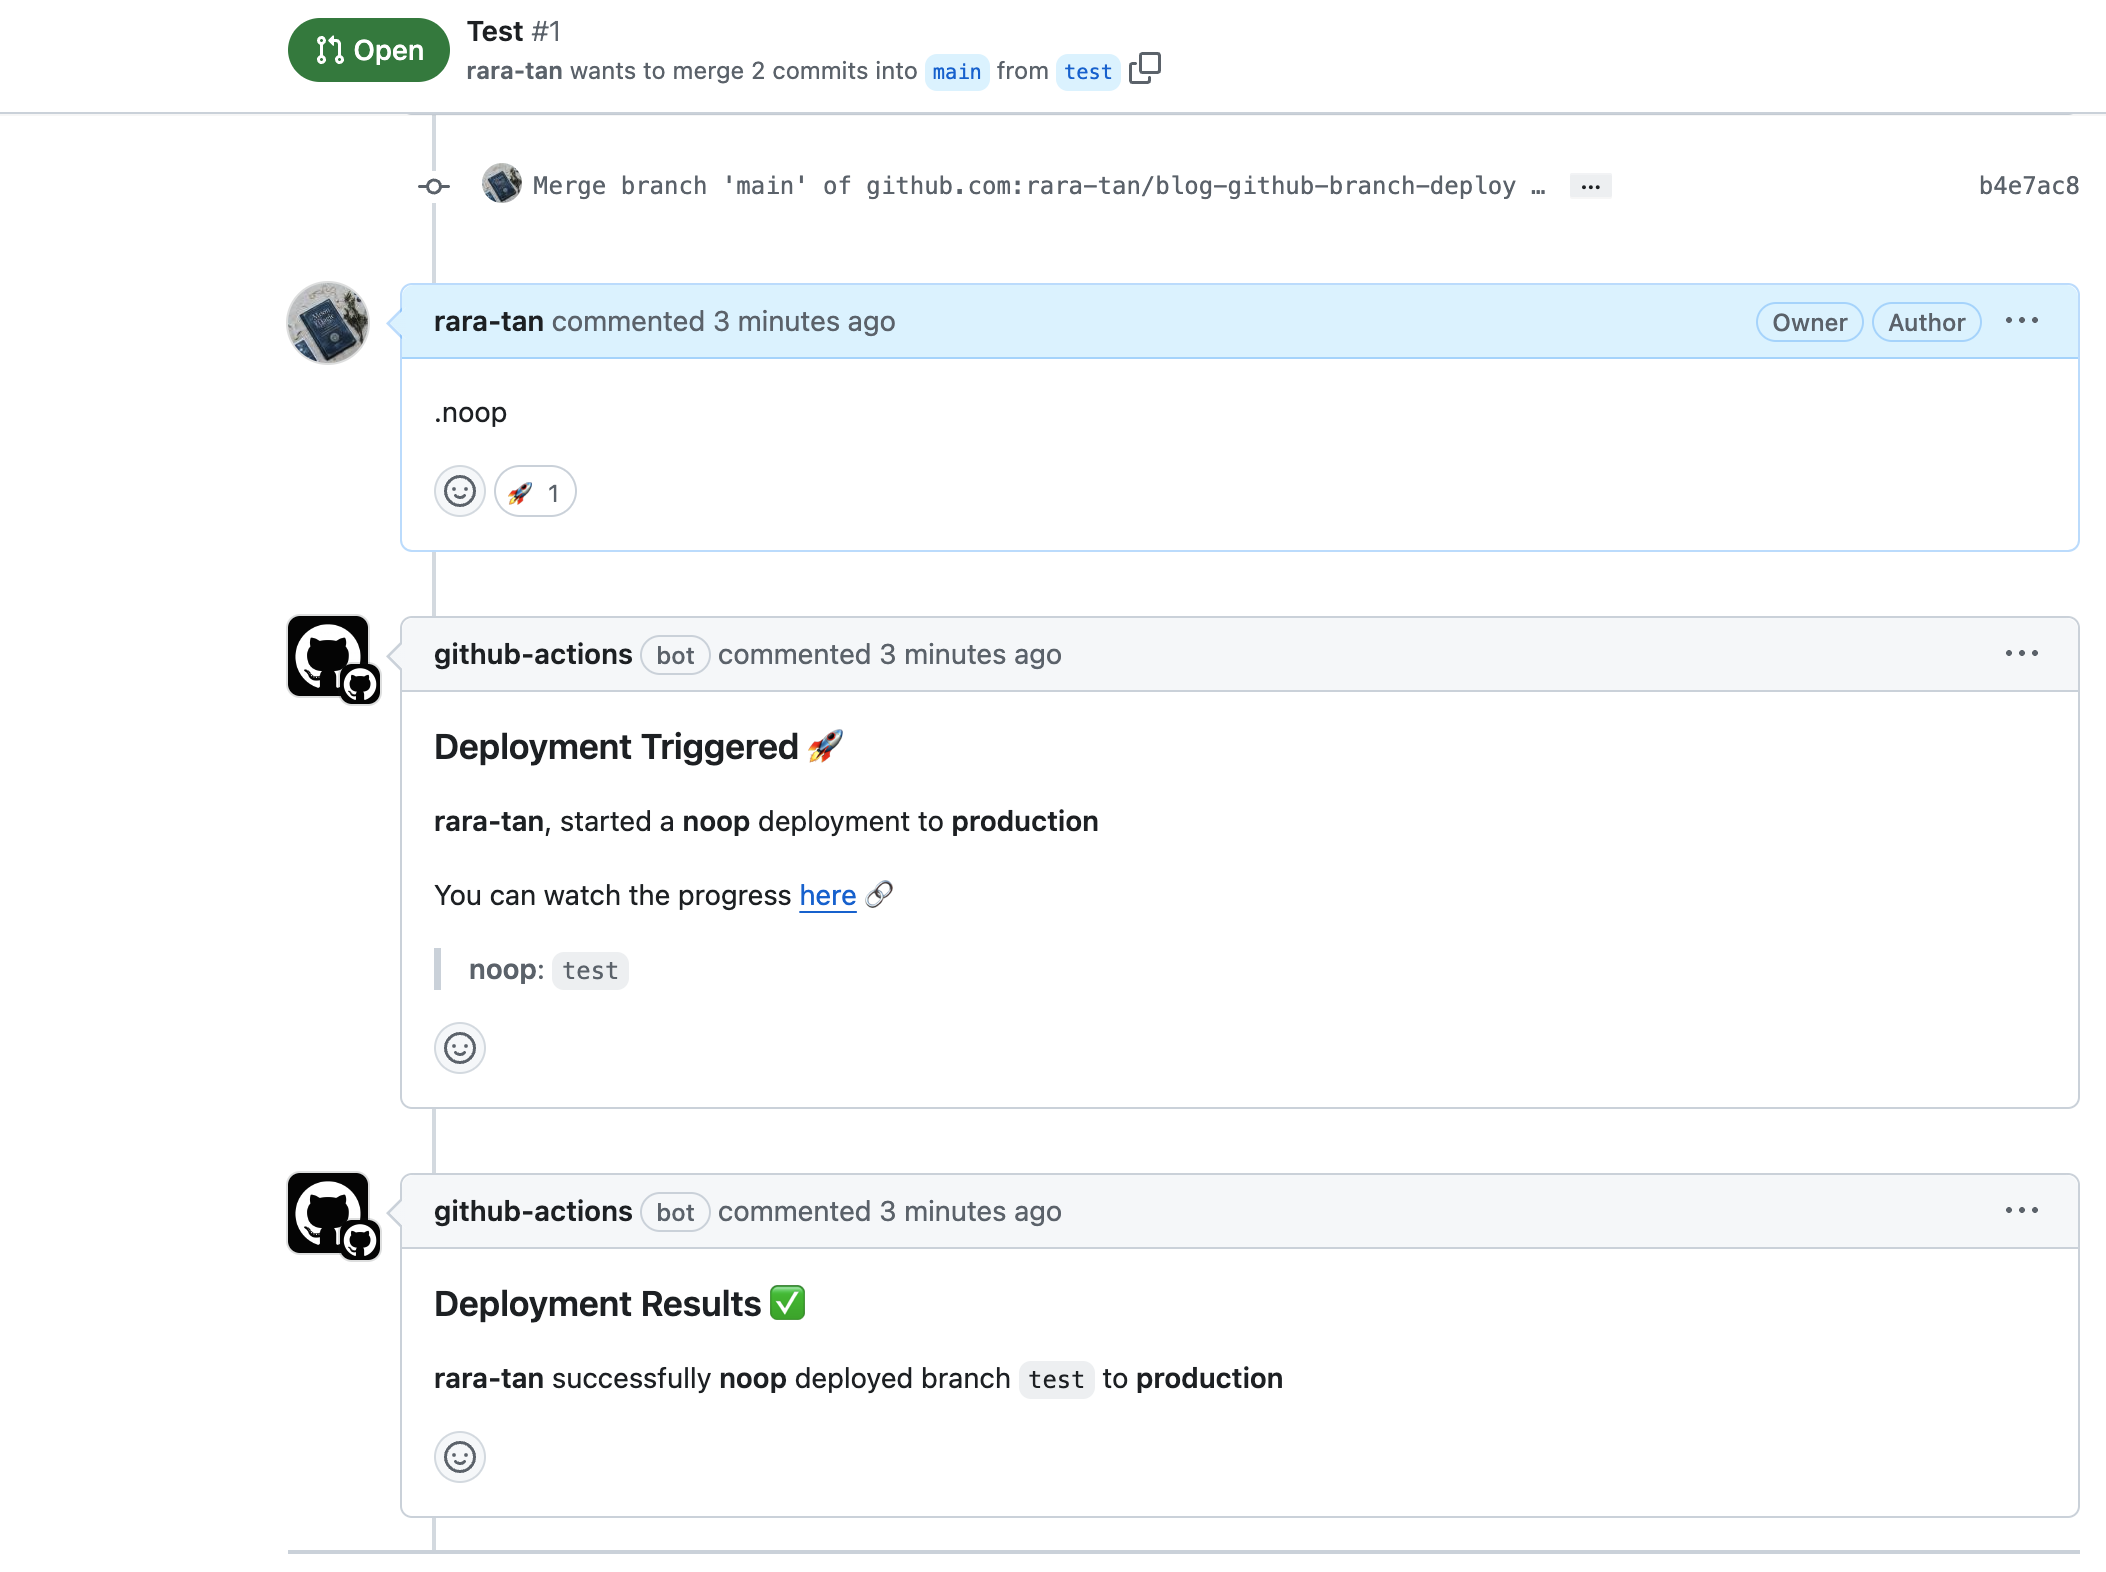
すると、このようにNoop Deployで設定したStepがGithub Actions上で実行されます。
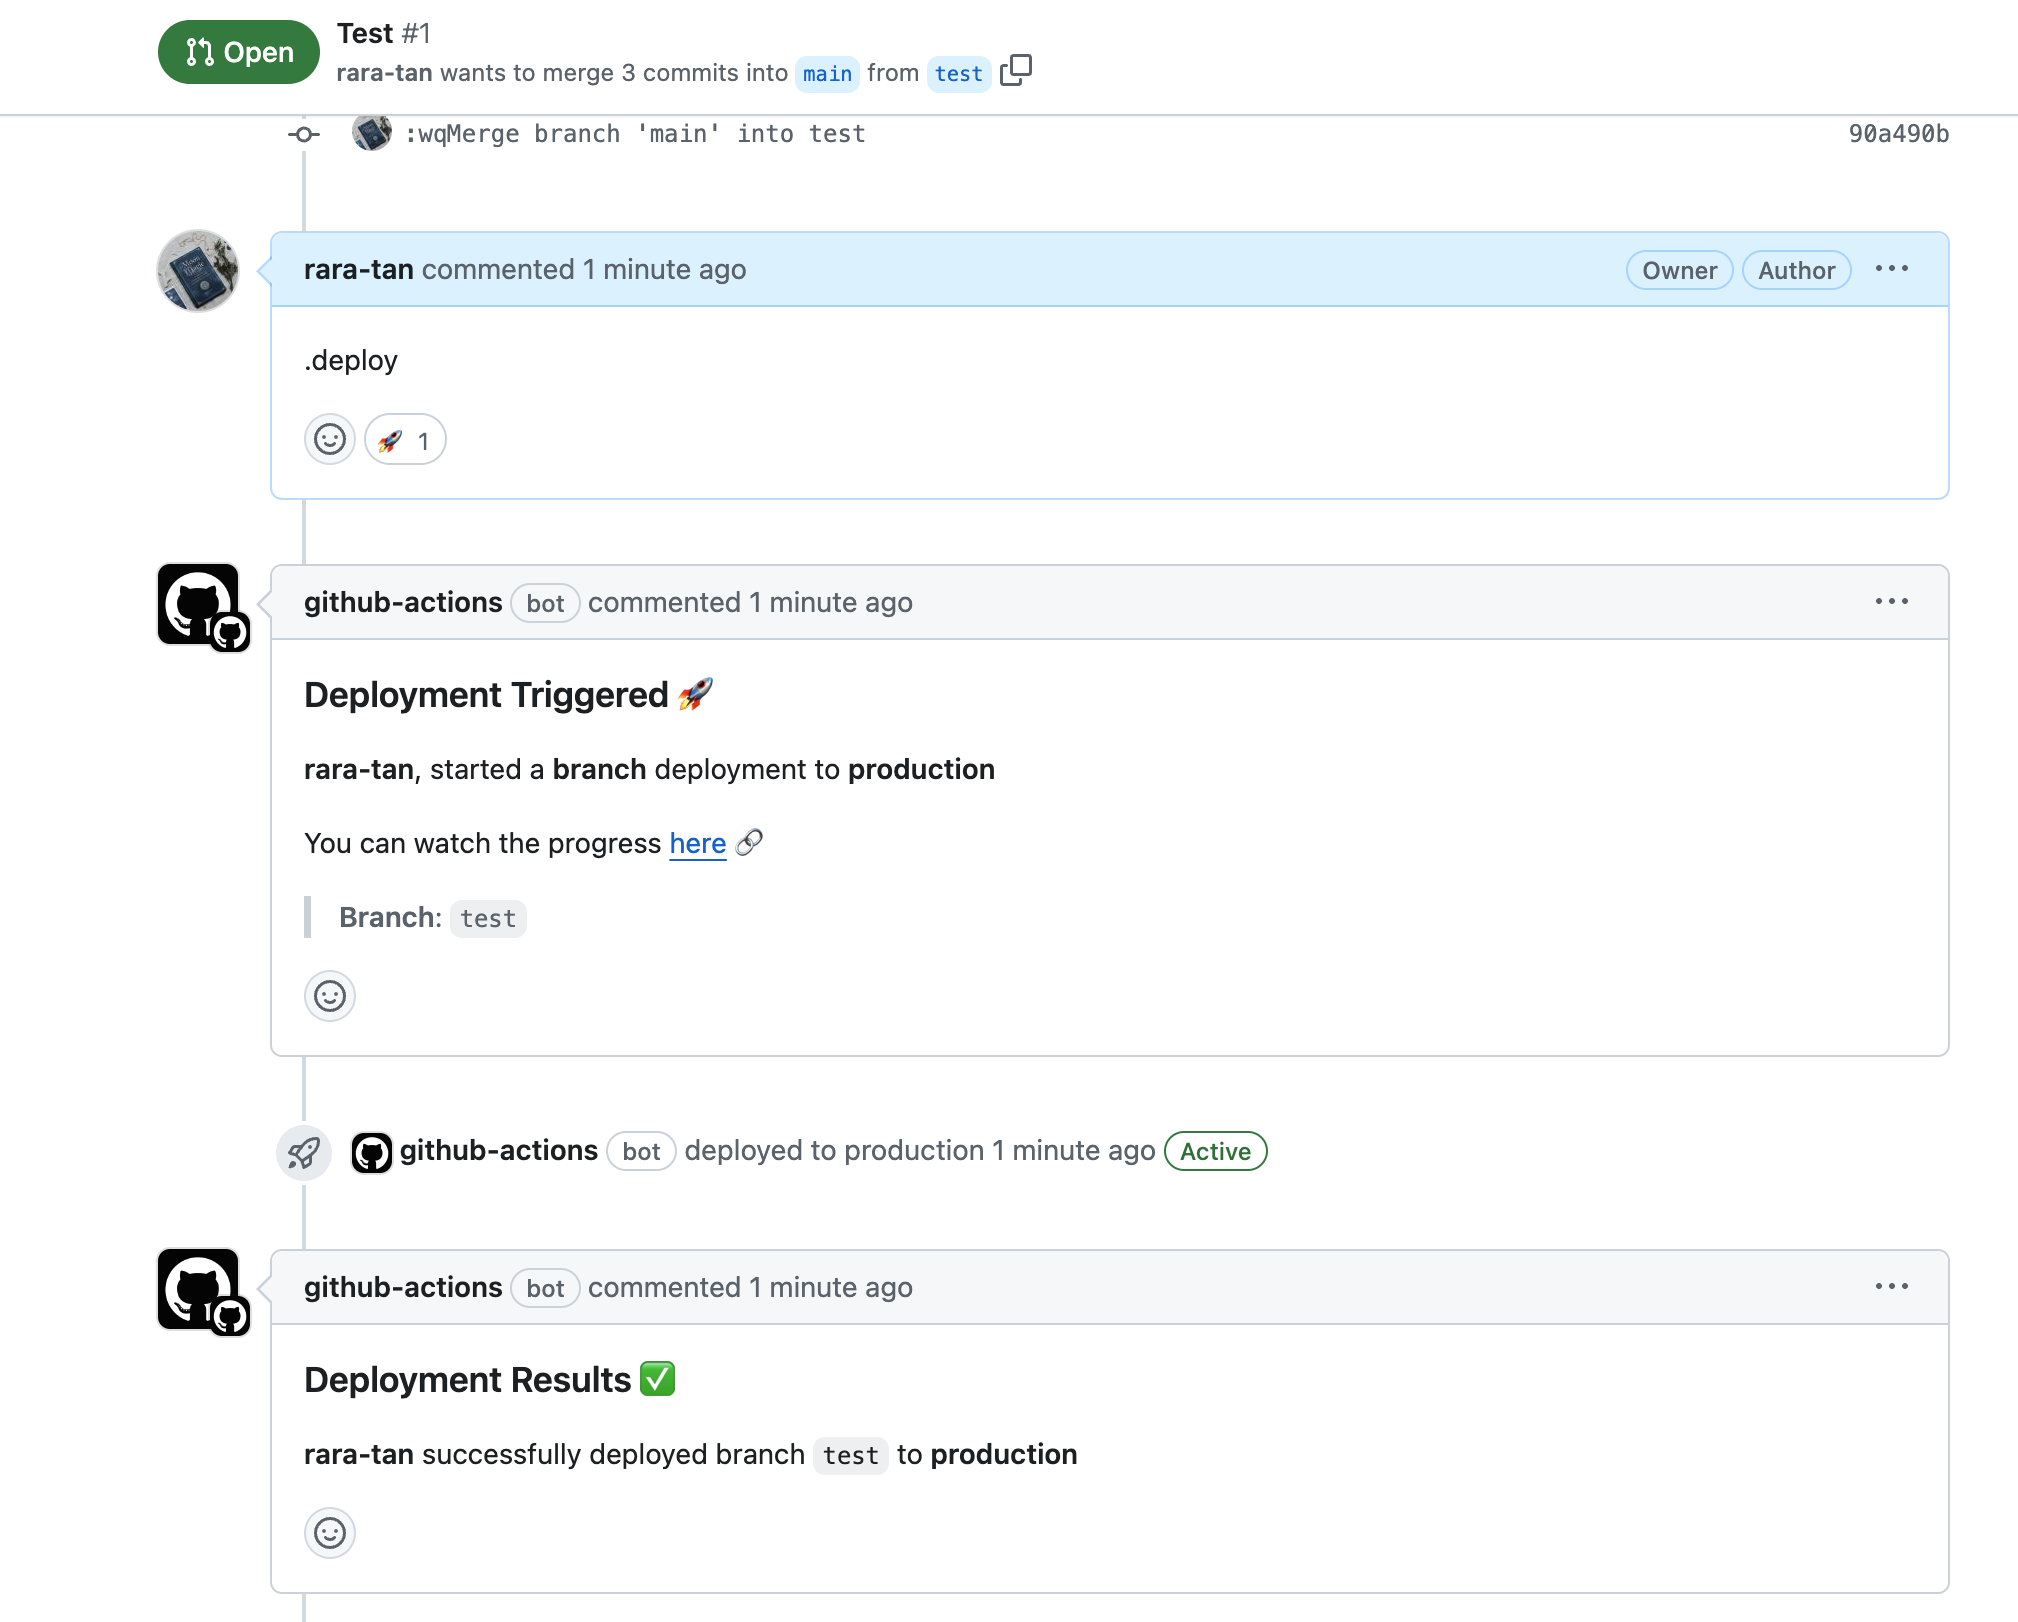
.deployコマンドでNoop Deployが実行されないことを確認する
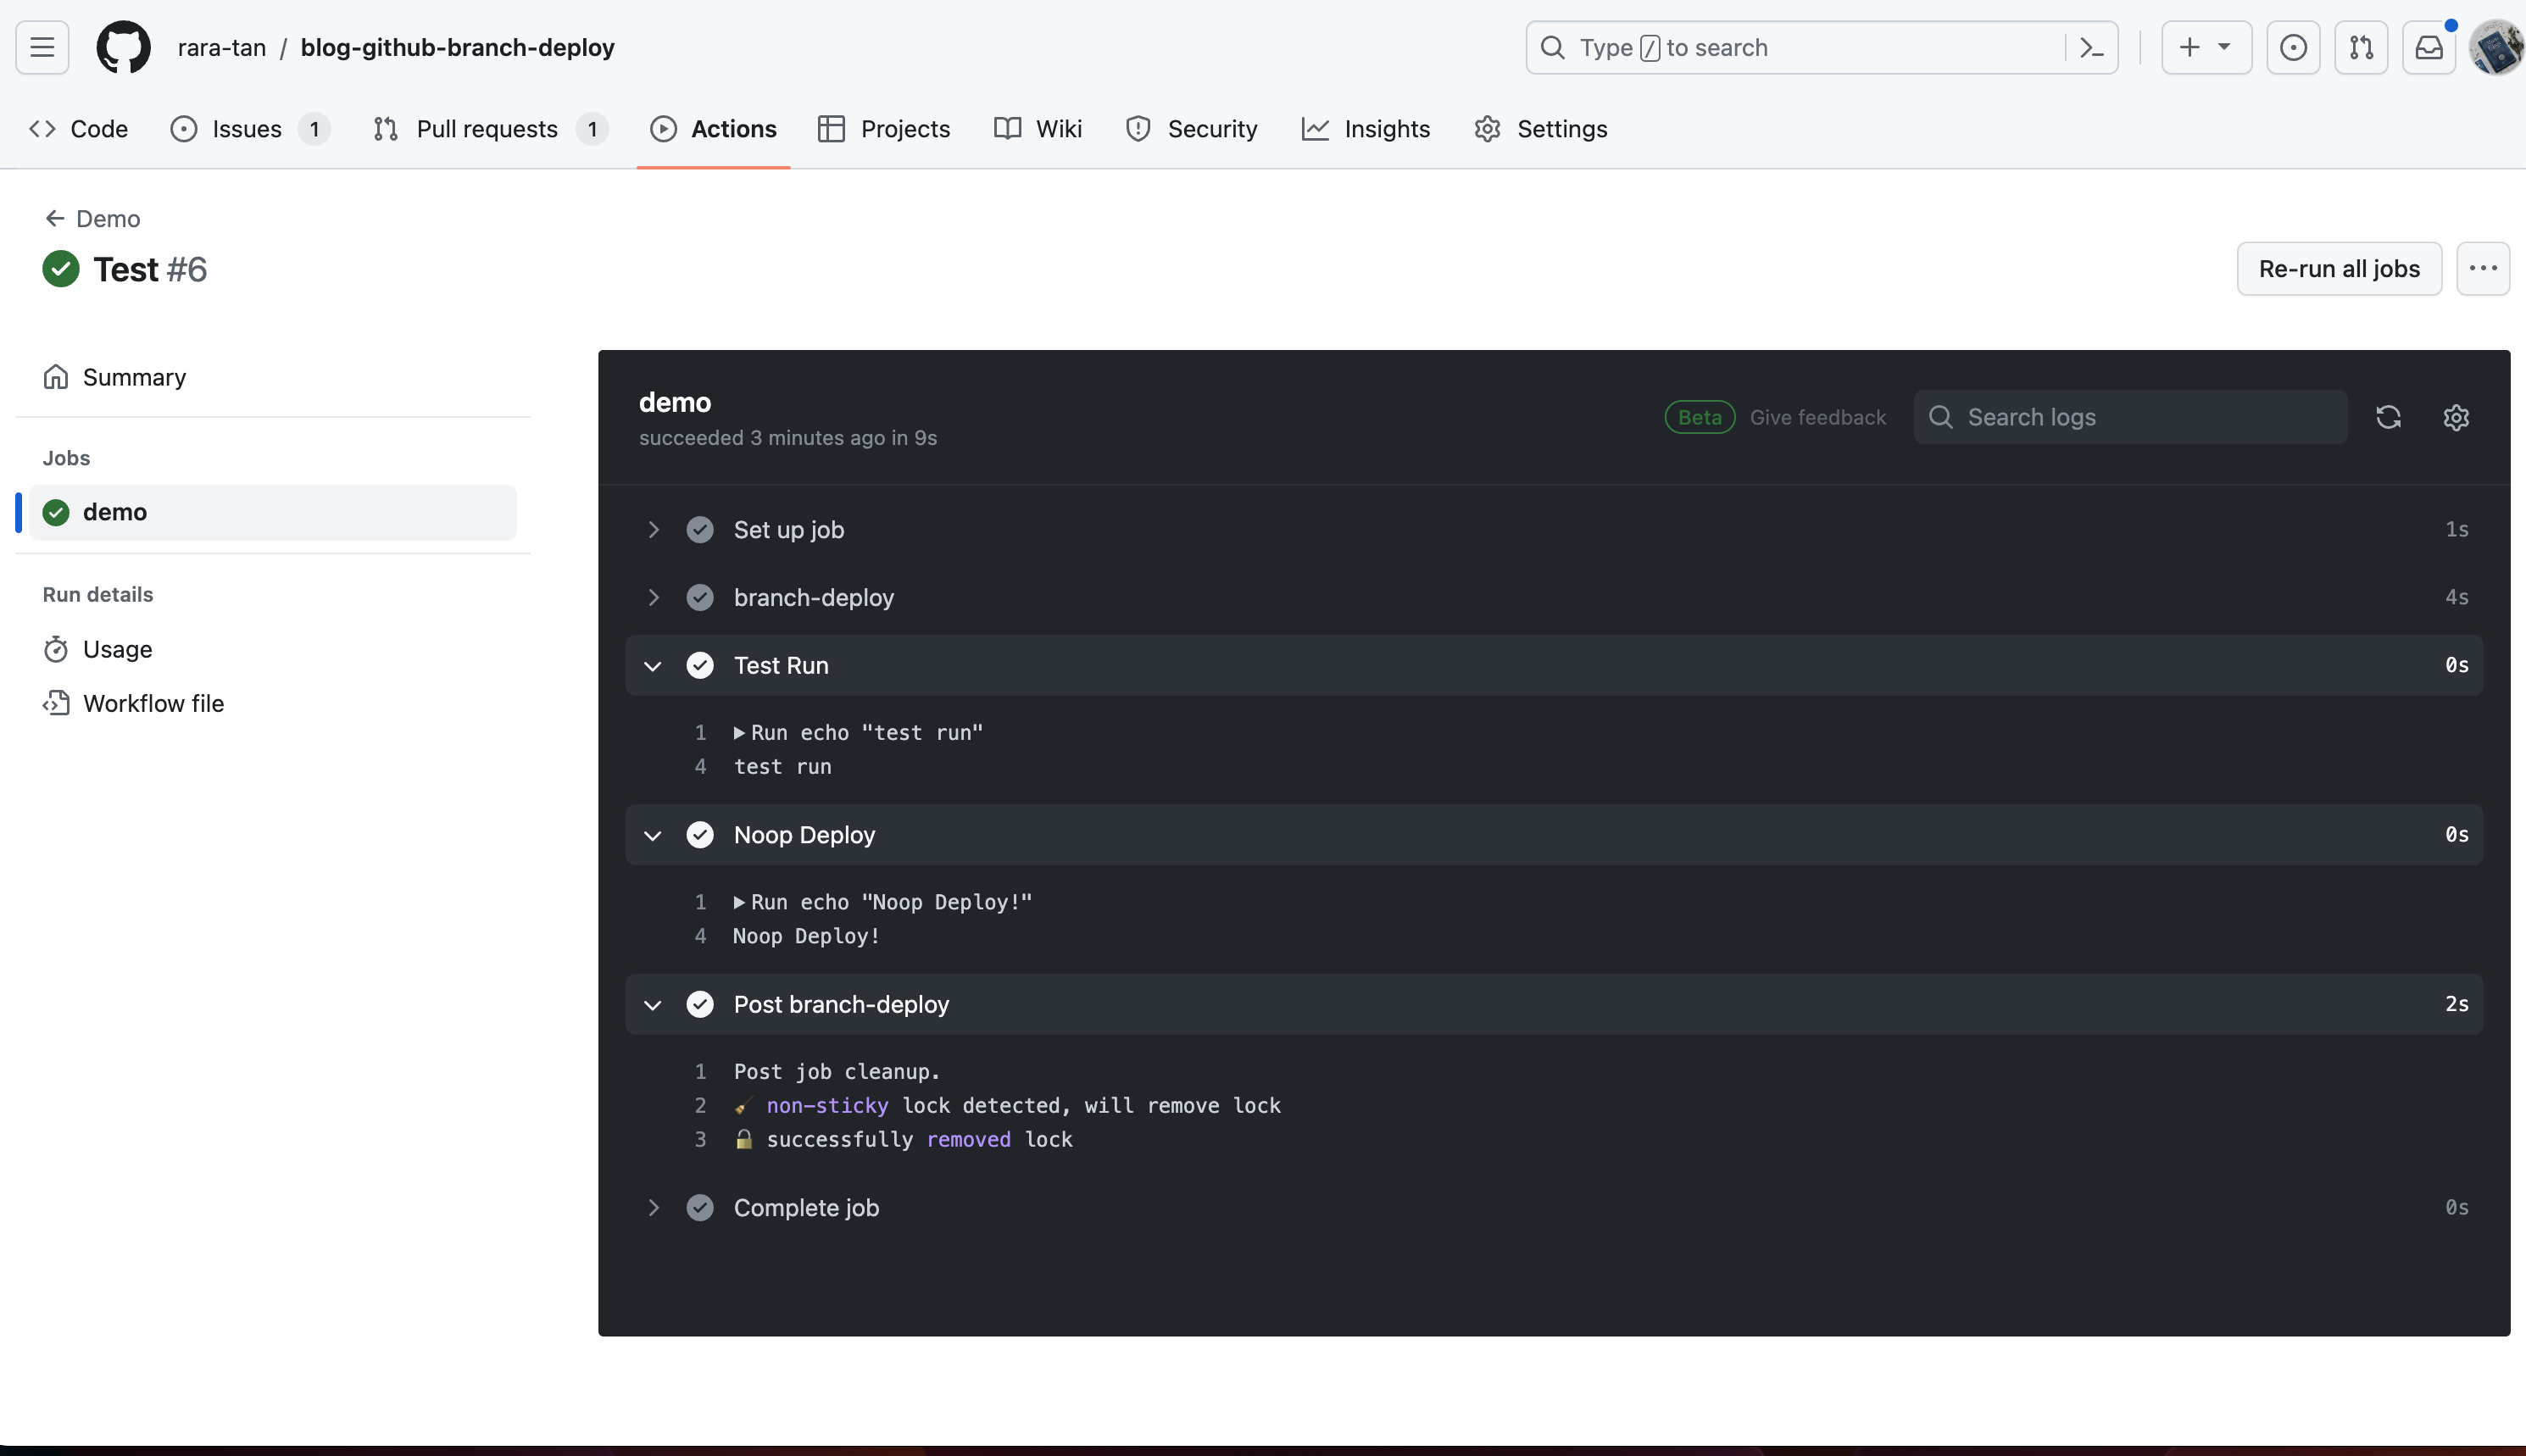
.deployコマンドでNoop Deployが実行されないことも確認しておきます。
このように.deployコマンドの時はNoop DeployステップがSkipされたことを確認できます。
Deployコマンド実行時のみのStepを追加する
先ほどは.noopコマンドを実行した時にみ実行されるステップを追加しました。
今回は、.deployの時のみに実行されるコマンドを実装します。
demo.yml
name: Demo

# The workflow to execute on is comments that are newly created
on:
  issue_comment:
    types: [created]

# Permissions needed for reacting and adding comments for IssueOps commands
permissions:
  pull-requests: write
  deployments: write
  contents: write
  checks: read

jobs:
  demo:
    if: ${{ github.event.issue.pull_request }}
    runs-on: ubuntu-latest
    steps:
      - name: branch-deploy
        id: branch-deploy
        uses: github/[email protected]

      - name: Test Run
        run: echo "test run"

      - name: Noop Deploy
        if: ${{ steps.branch-deploy.outputs.continue == 'true' && steps.branch-deploy.outputs.noop == 'true' }}
        run: echo "Noop Deploy!"

      - name: Regular Deploy
        if: ${{ steps.branch-deploy.outputs.continue == 'true' && steps.branch-deploy.outputs.noop != 'true' }}
        run: echo "Regular Deploy!"
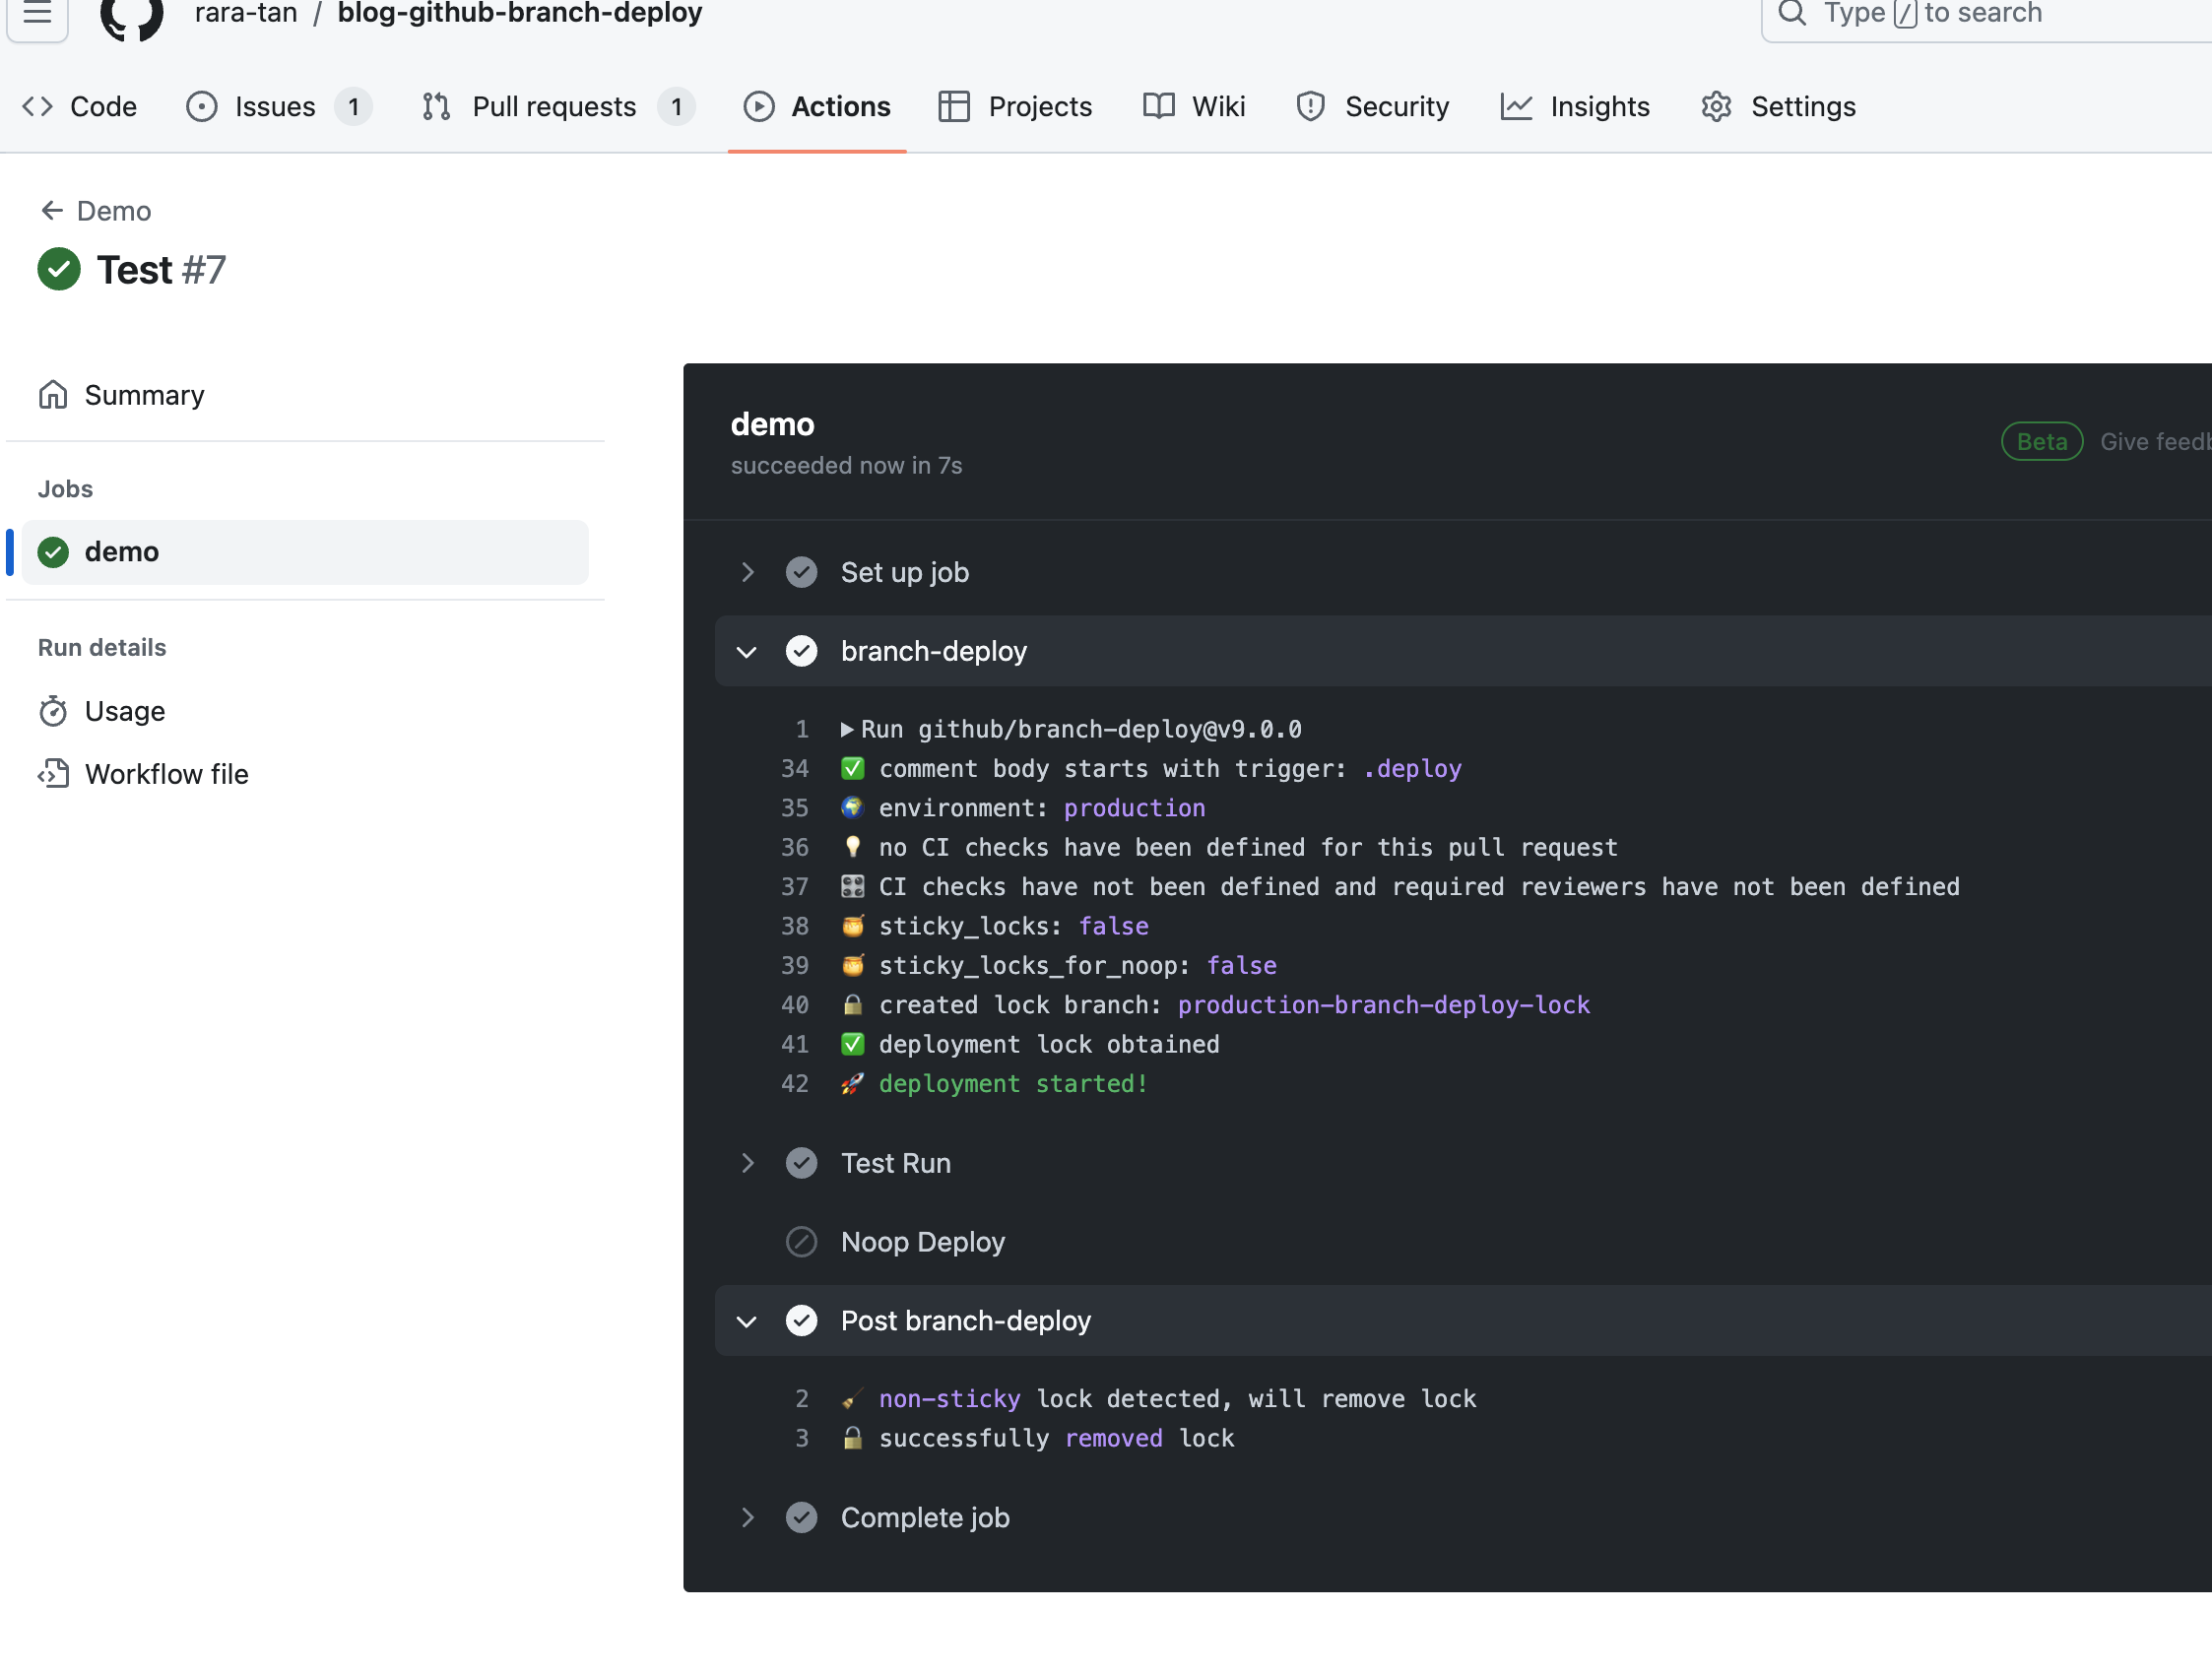
最終行に.deployコマンドの時のみ実行されるStepを追加しました。
この状態で.deployコマンドを実行します。
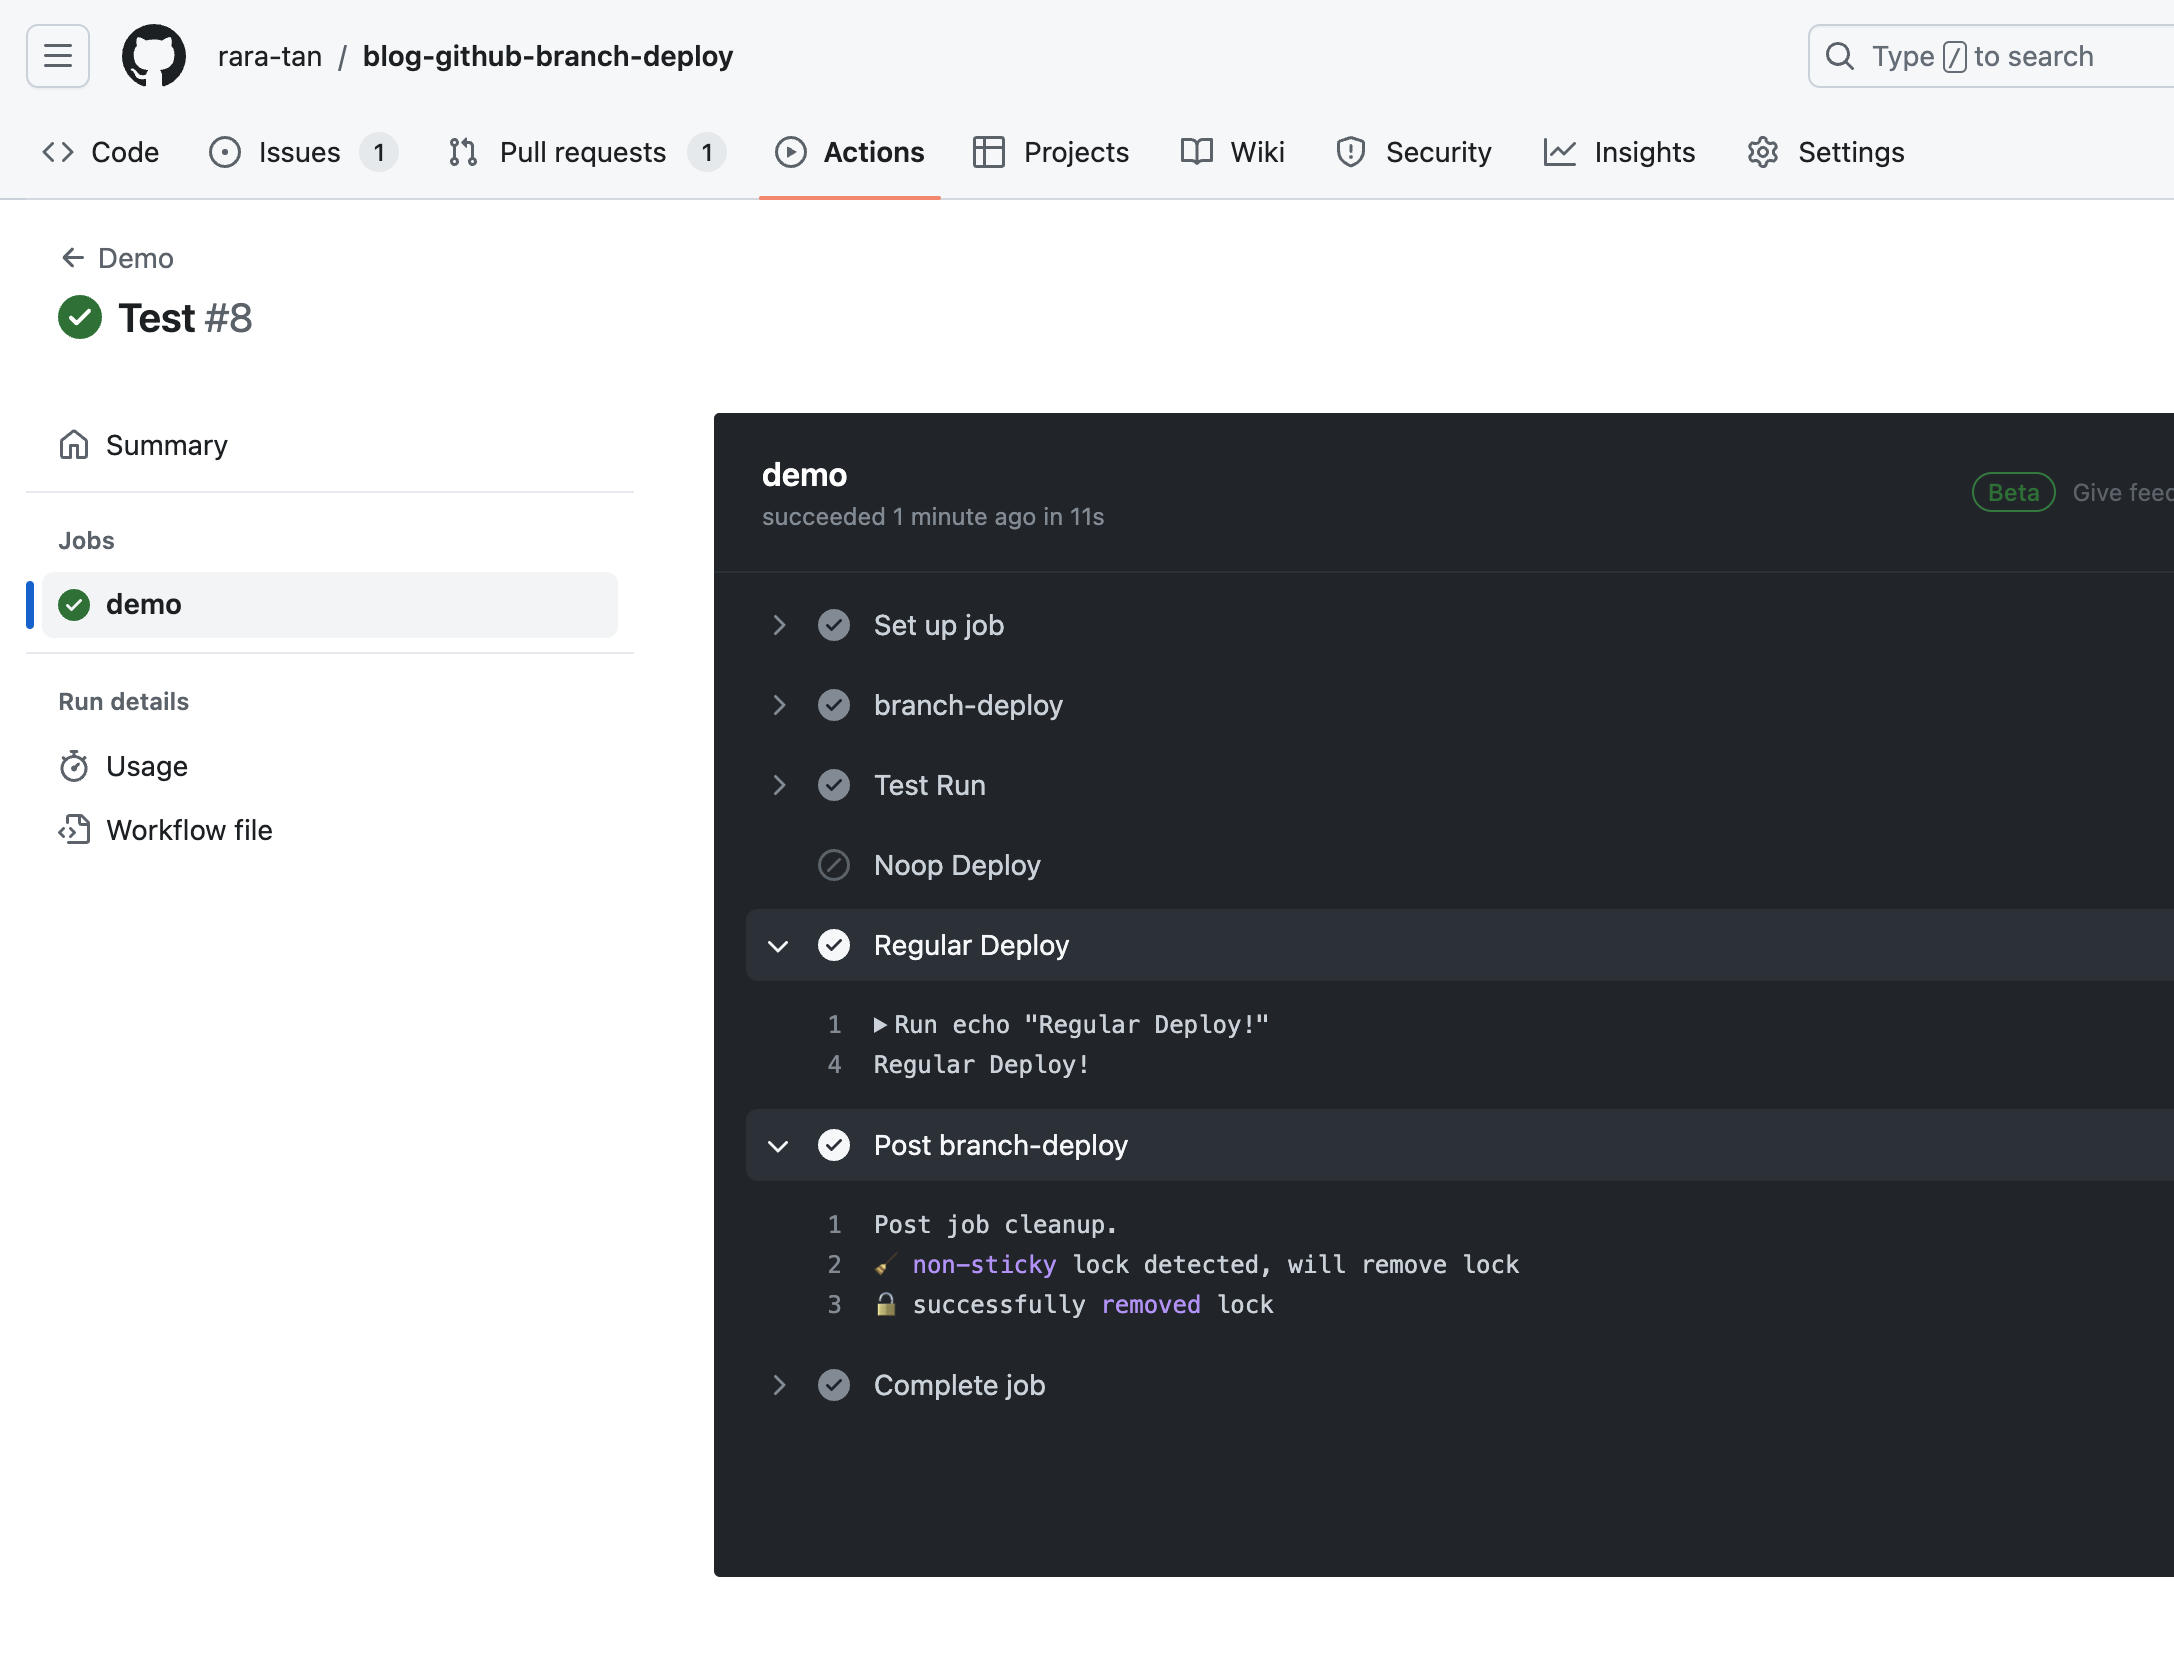
すると、上記のように正常に指定したコマンドが実行されることを確認できました。
環境を切り替える
基本的なBranch Deployモデルに関する解説は完了しました。
次に、Branch DeployのEnviromentの機能を使って、複数環境にリリースする方法を解説します。
Deployコマンドで環境を指定する
ここまでで解説したように、Branch Deployモデルでは.deploy or .noopコマンドにてGithub Actionsをトリガーすることができます。
これらのコマンドの後ろに環境名を追記することで、特定の環境に対してGithub Actionsを実行することが可能です。
.deploy stagingの入力した場合はstaging環境に対してリリースが行われ、.noop productionと入力した場合はproduction環境に対してnoopデプロイが行われます。
※環境名を指定しない場合のデフォルト値はproductionのため、今まで実行していた.deployや.noopは.deploy productionと.noop productionを実行していたのと同じになります。
Deployコマンドの環境名ごとに処理を変える
それでは、コマンドで環境名を指定したときに実行するコマンドを変える処理を追加します。
demo.yml
name: Demo

# The workflow to execute on is comments that are newly created
on:
  issue_comment:
    types: [created]

# Permissions needed for reacting and adding comments for IssueOps commands
permissions:
  pull-requests: write
  deployments: write
  contents: write
  checks: read

jobs:
  demo:
    if: ${{ github.event.issue.pull_request }}
    runs-on: ubuntu-latest
    steps:
      - name: branch-deploy
        id: branch-deploy
        uses: github/[email protected]

      - name: Test Run
        run: echo "test run"

      - name: Noop Deploy
        if: ${{ steps.branch-deploy.outputs.continue == 'true' && steps.branch-deploy.outputs.noop == 'true' }}
        run: echo "Noop Deploy!"

      - name: Regular Deploy
        if: ${{ steps.branch-deploy.outputs.continue == 'true' && steps.branch-deploy.outputs.noop != 'true' }}
        run: echo "Regular Deploy!"

      - name: Production Noop Deploy
        if: ${{ steps.branch-deploy.outputs.continue == 'true' && steps.branch-deploy.outputs.noop == 'true' && steps.branch-deploy.outputs.environment == 'production' }}
        run: echo "Production Noop Deploy!"

      - name: Production Regular Deploy
        if: ${{ steps.branch-deploy.outputs.continue == 'true' && steps.branch-deploy.outputs.noop != 'true' && steps.branch-deploy.outputs.environment == 'production' }}
        run: echo "Production Regular Deploy!"

      - name: Staging Noop Deploy
        if: ${{ steps.branch-deploy.outputs.continue == 'true' && steps.branch-deploy.outputs.noop == 'true' && steps.branch-deploy.outputs.environment == 'staging' }}
        run: echo "Staging Noop Deploy!"

      - name: Staging Regular Deploy
        if: ${{ steps.branch-deploy.outputs.continue == 'true' && steps.branch-deploy.outputs.noop != 'true' && steps.branch-deploy.outputs.environment == 'staging' }}
        run: echo "Staging Regular Deploy!"
- Production Noop Deploy
- Production Regular Deploy
- Staging Noop Deploy
- Staging Regular Deploy
の4つの条件分岐を追加しました。
この状態でコマンド実行します。
.deploy production
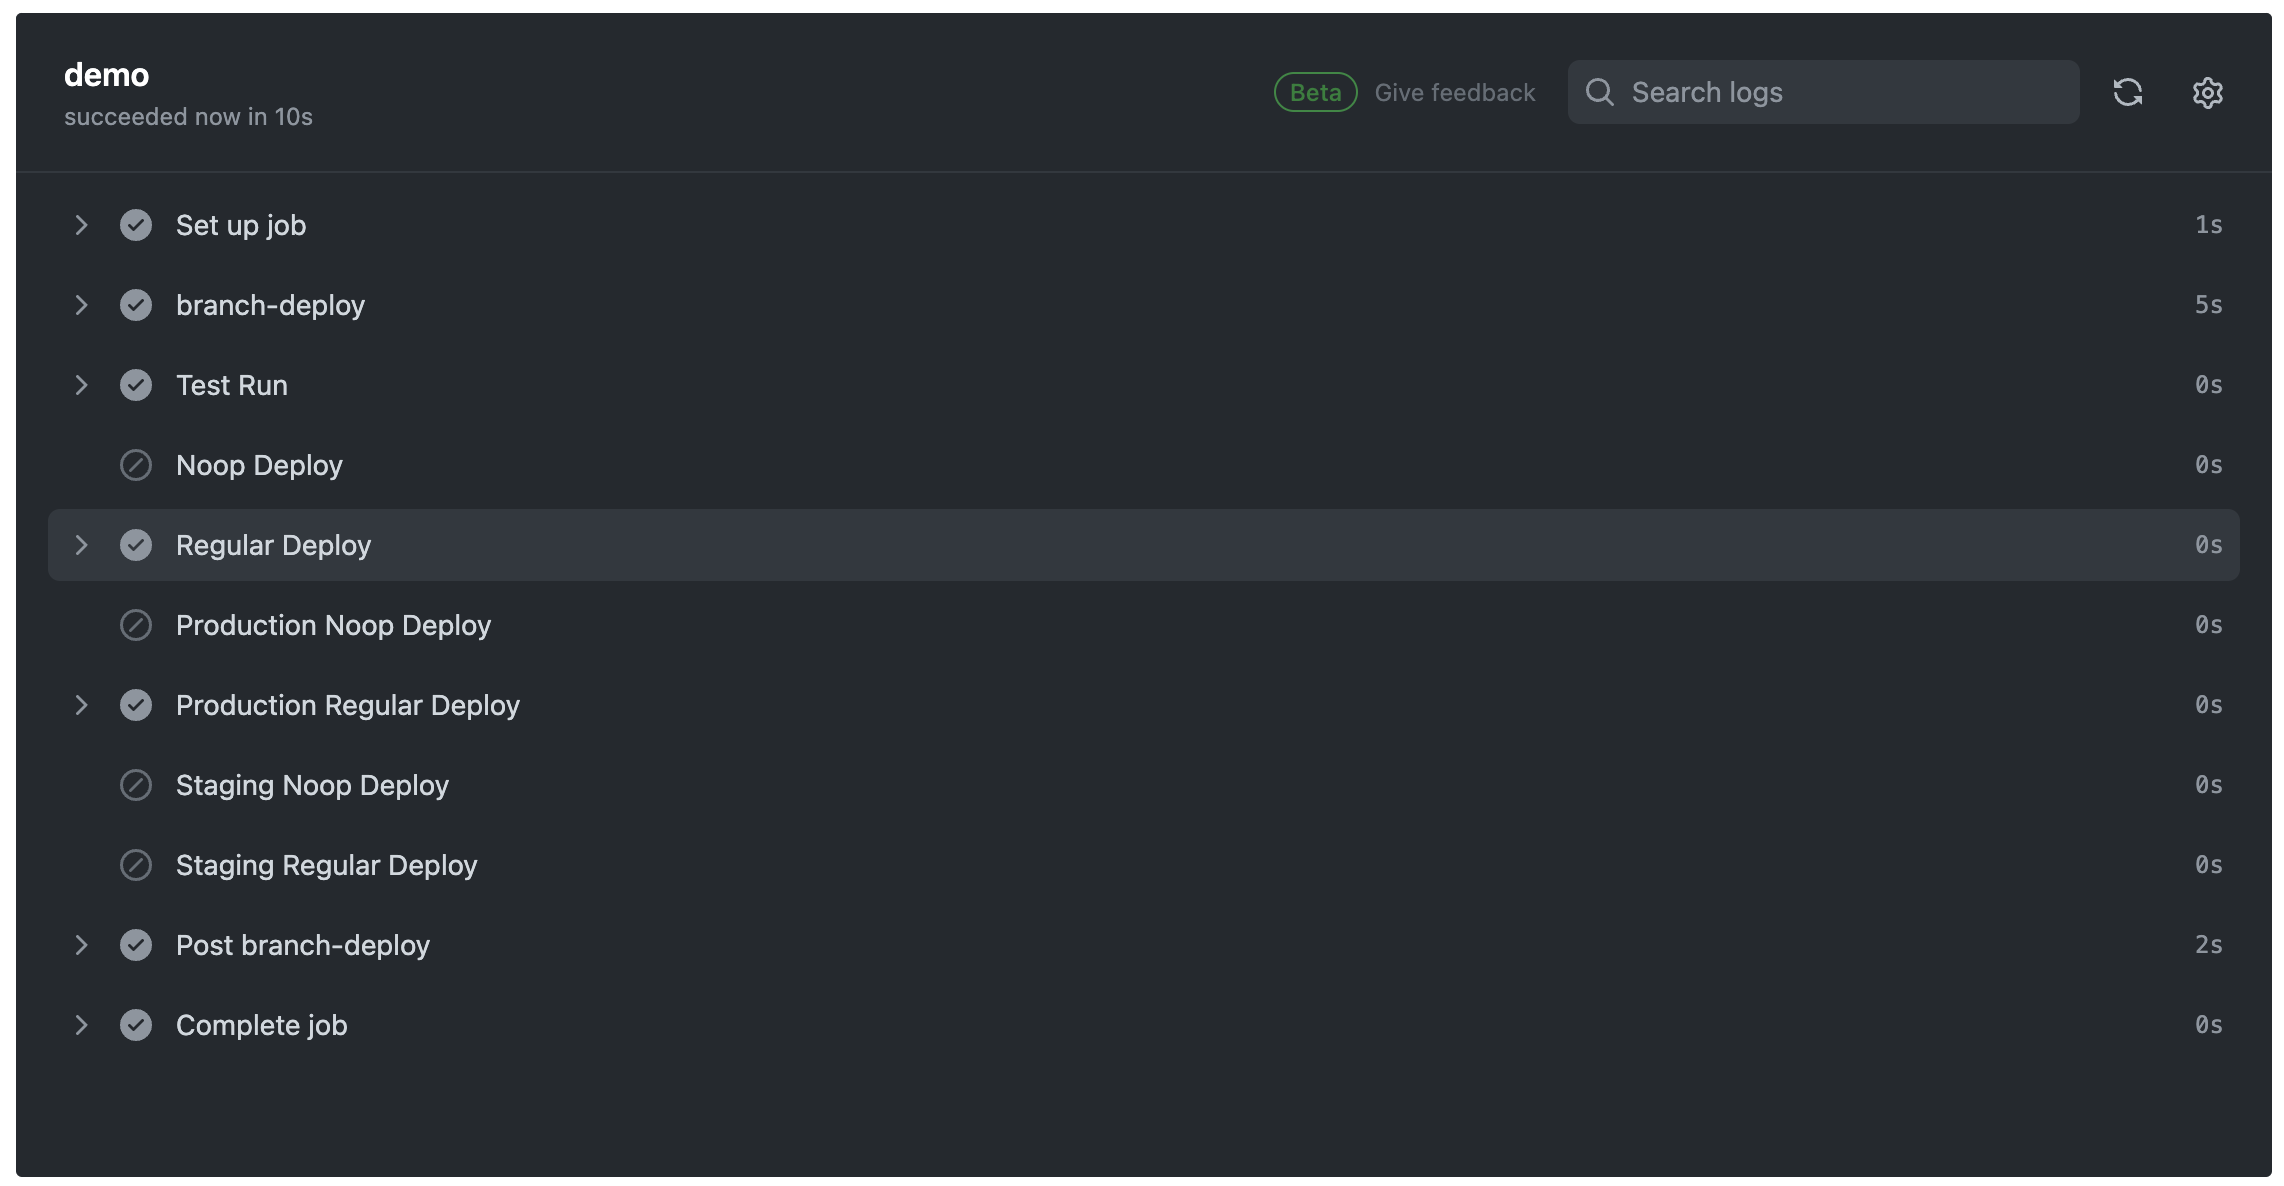
.noop production
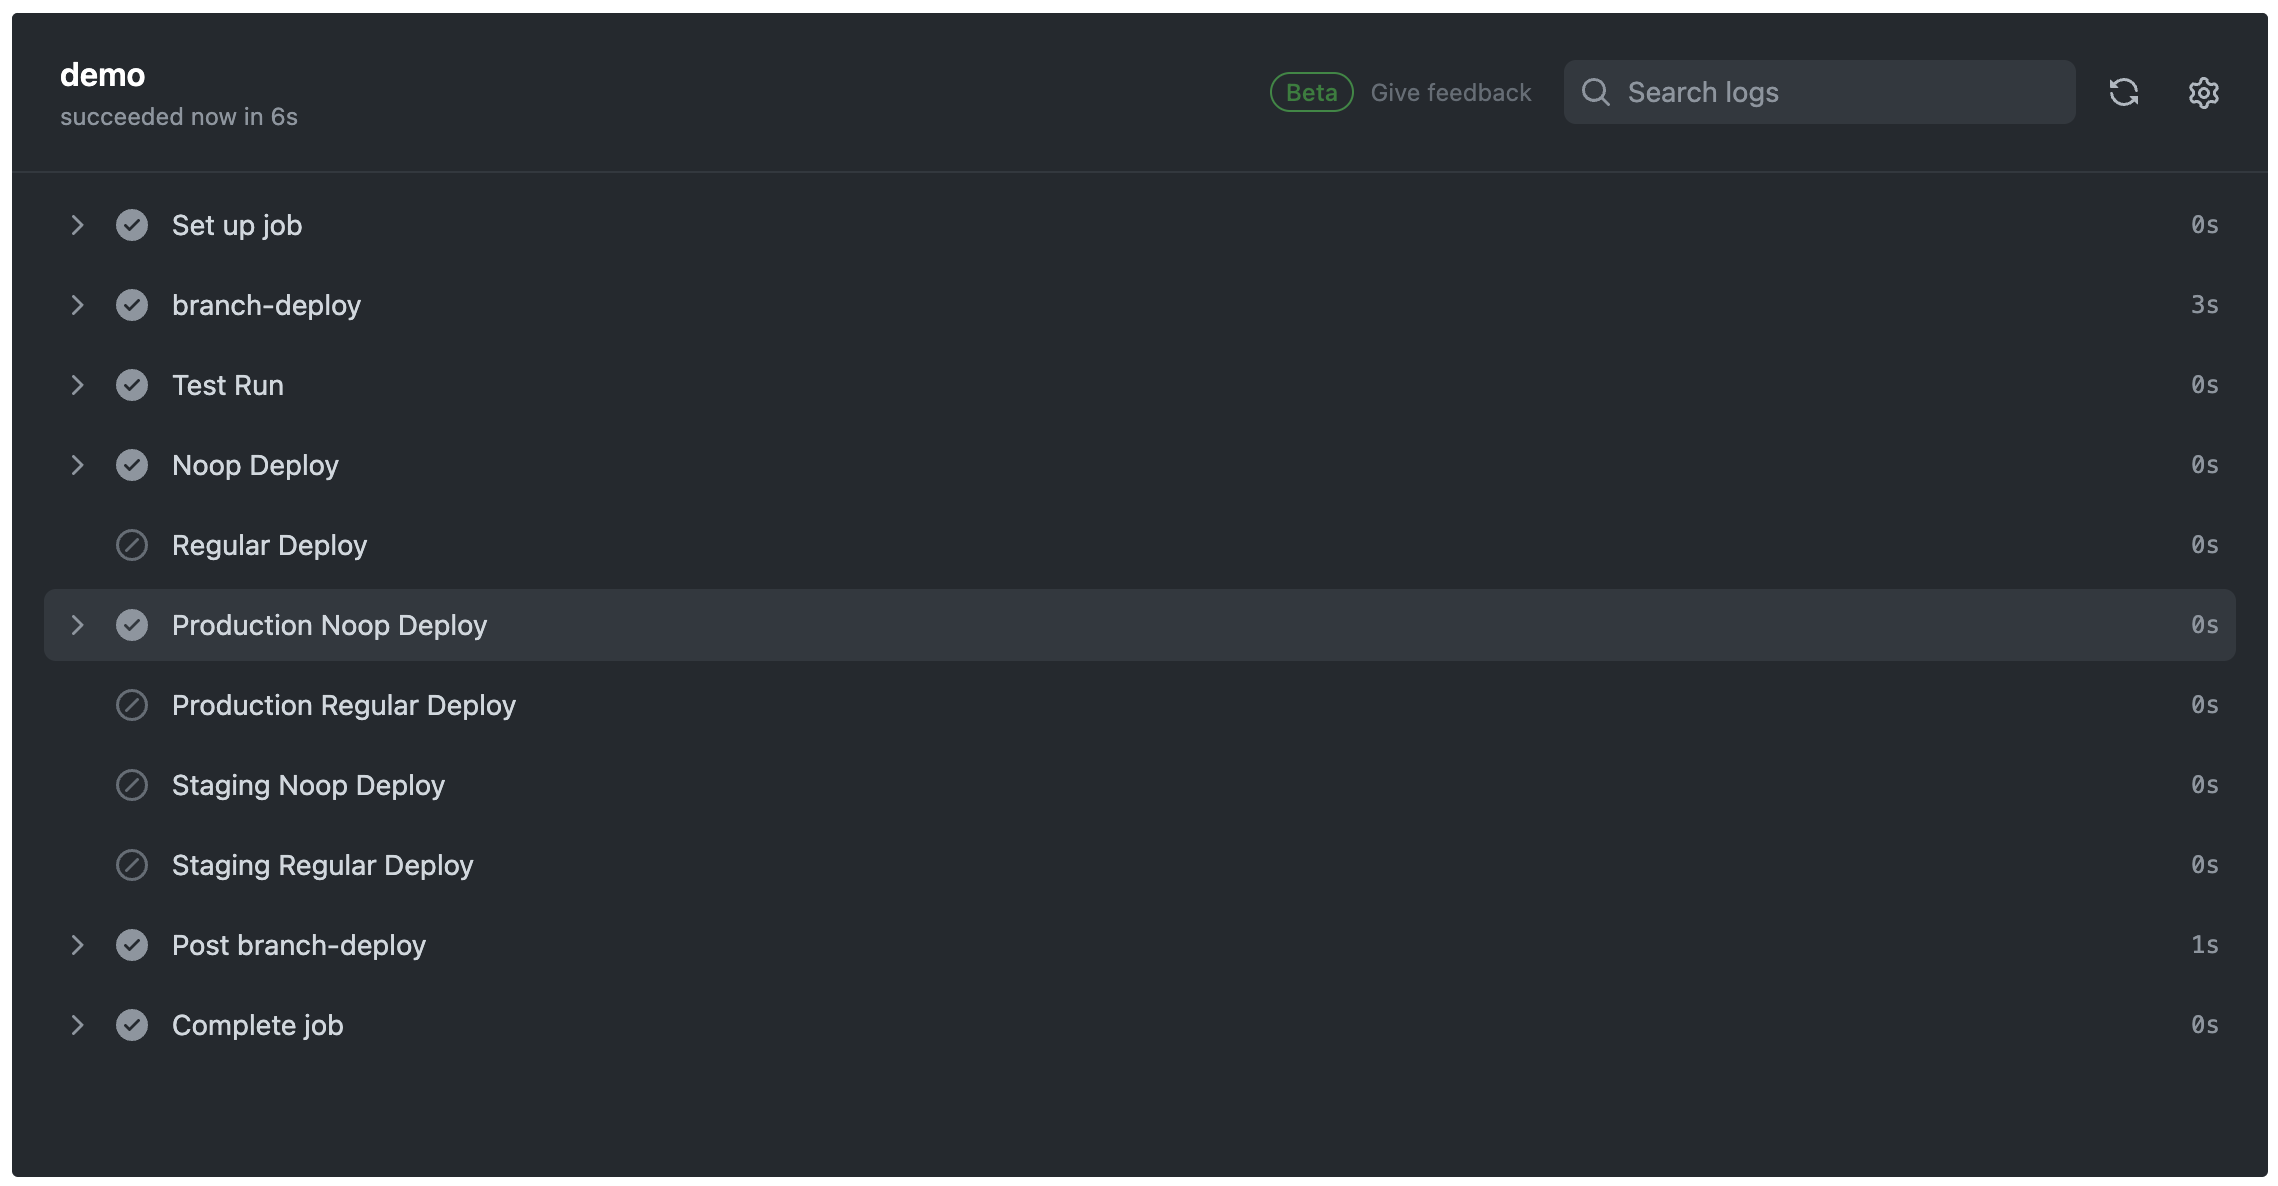
.deploy staging
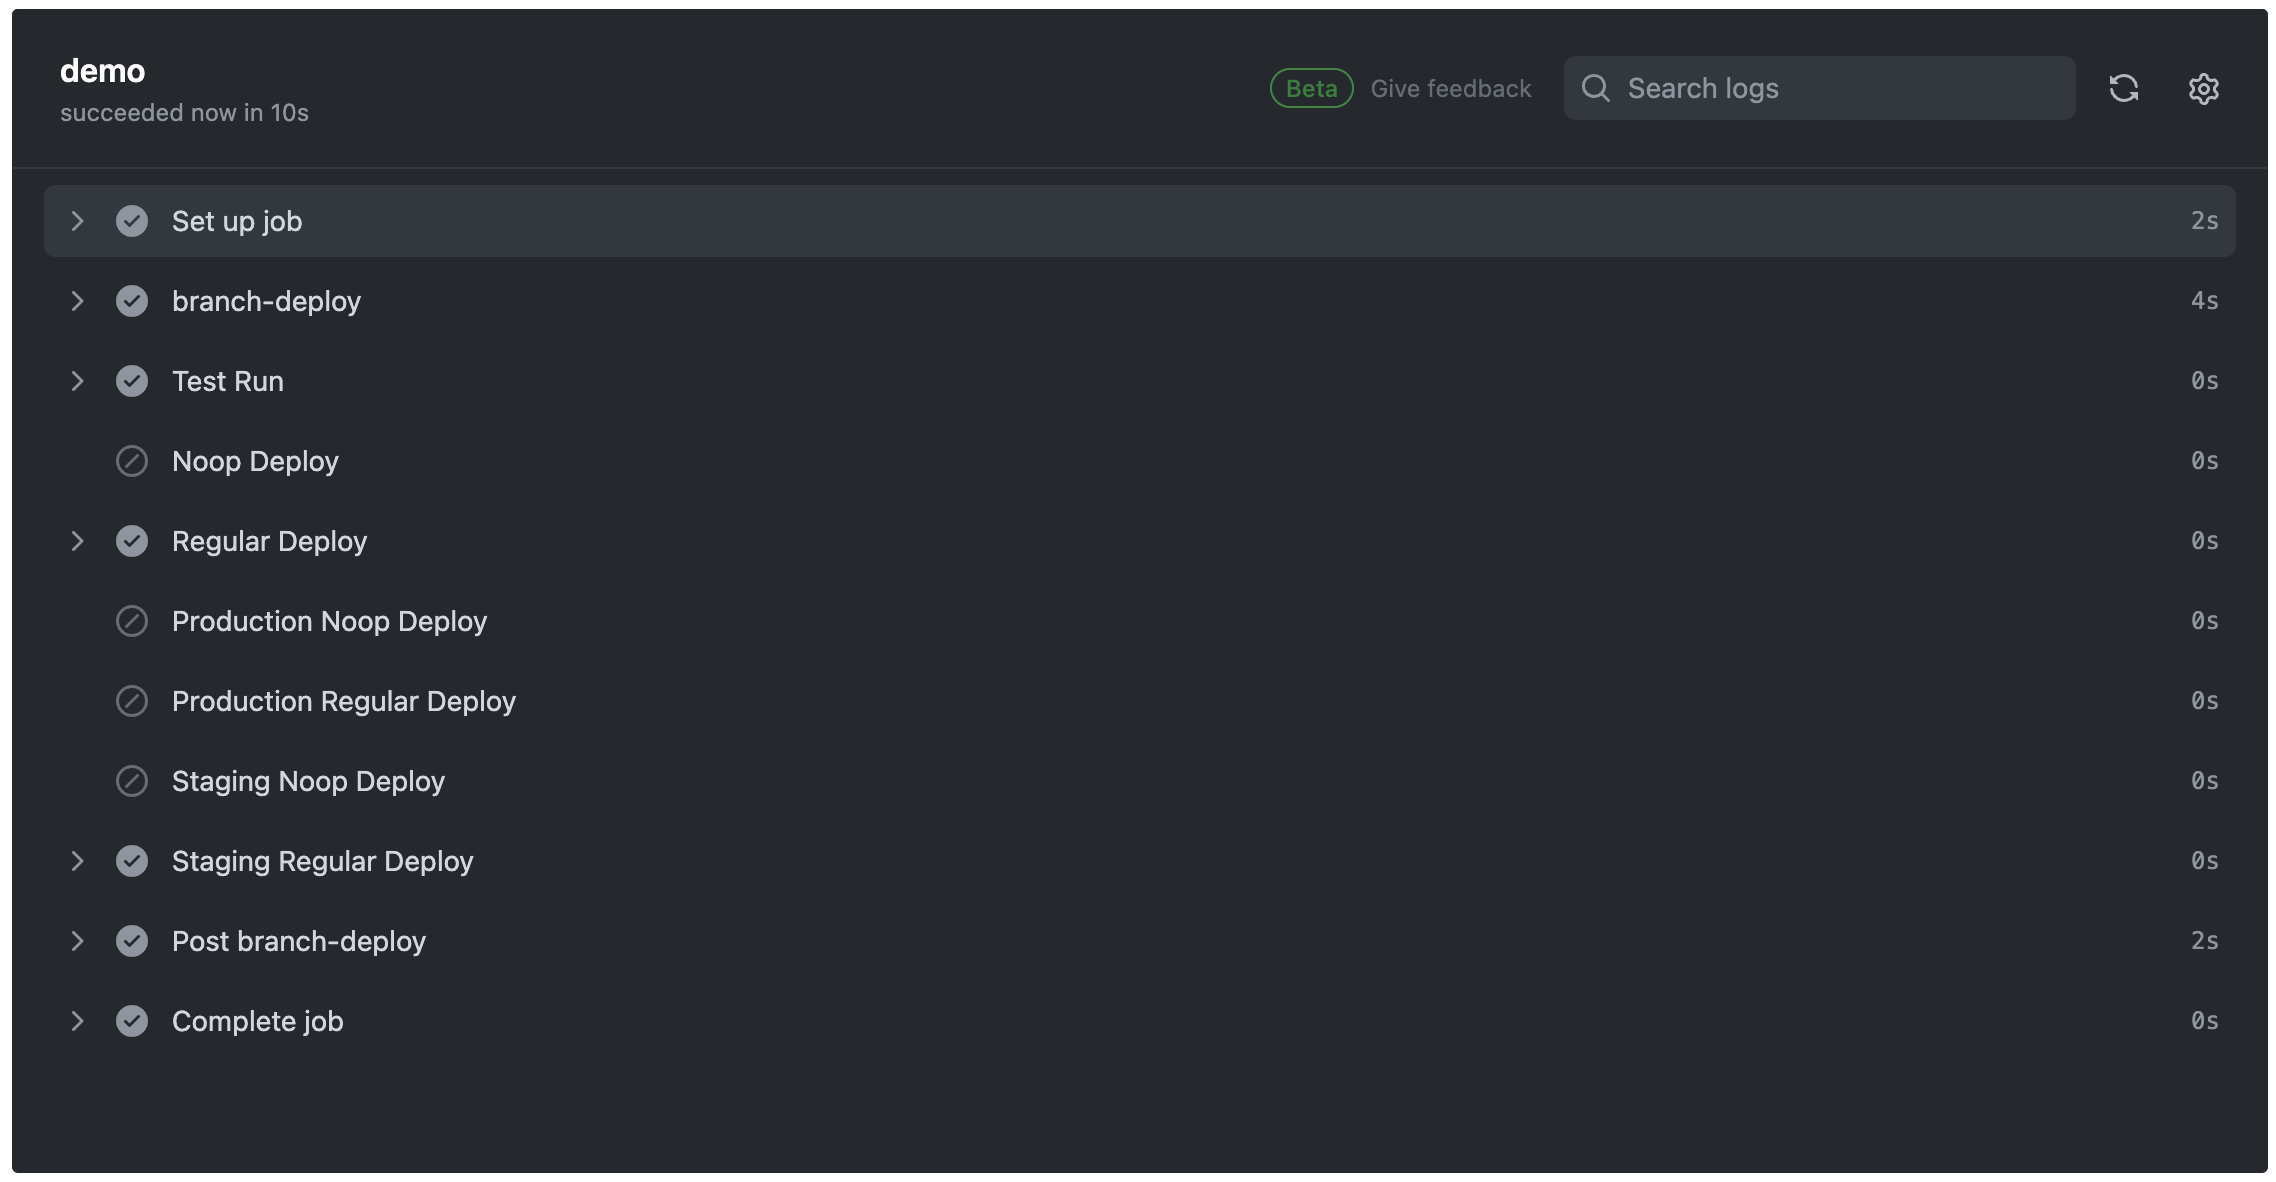
.noop staging
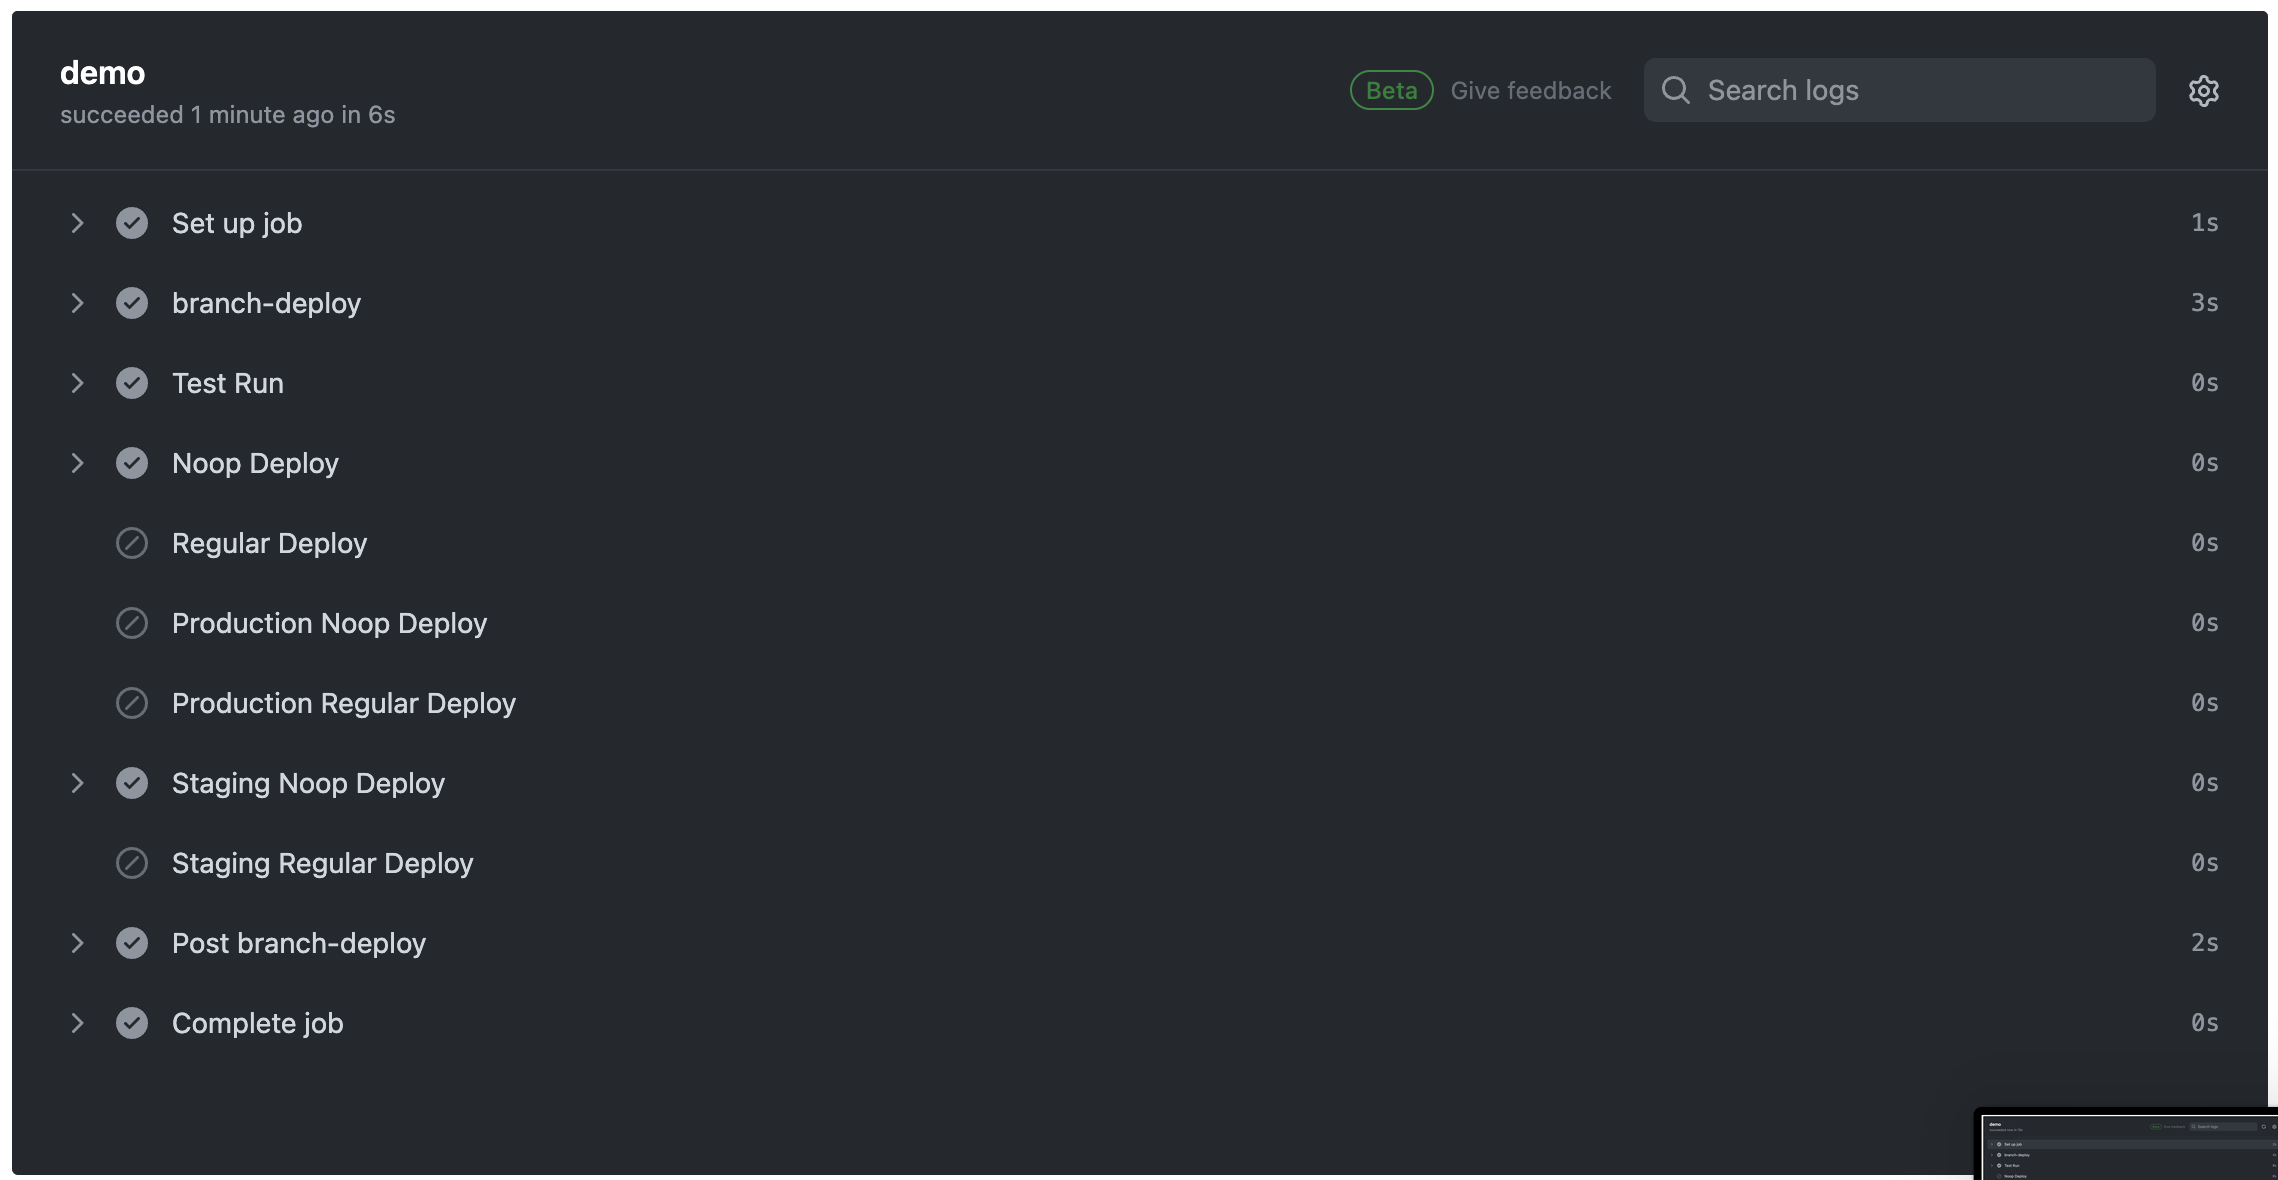
それぞれのコマンド毎のGithub Actionsの実行結果です。
環境とnoopの組み合わせでそれぞれ異なるStepが実行されていることを確認できます!
GithubのEnvironmentとBranch DeployのEnvironment
Githubを長年使っているユーザーならば、Github自体のEnvironmentを利用したことがあるかもしれません。
この機能を使うと、環境ごとに異なるSecretや環境変数を設定できるため多くの環境を運用している開発チームにとって非常に使いやすい機能です。
このEnvironmentはBranch DeployのEnvironmentとは別物です。そのため、Branch Deploy上で環境名を指定したとしてもGithub上で指定されているEnvironmentの環境に切り替わることはありません。
Github上のEnvironmentを指定したい場合、以下のようにGithub Actionsのjob毎に設定しなければなりません。
demo.yml
name: Demo

# The workflow to execute on is comments that are newly created
on:
  issue_comment:
    types: [created]

# Permissions needed for reacting and adding comments for IssueOps commands
permissions:
  pull-requests: write
  deployments: write
  contents: write
  checks: read

jobs:
  demo:
    if: ${{ github.event.issue.pull_request }}
    runs-on: ubuntu-latest
    # ここを追加
    environment: production
    steps:
      - name: branch-deploy
        id: branch-deploy
        uses: github/[email protected]
このようにすることでGithubのEnvironmentのproduction環境に設定しているSecretやVariablesをワークフロー内で利用することができます。
Environmentの問題点
Branch Deployモデルを使う上で問題となるのは、Branch Deployモデルの環境とGithub自体の環境が同じにならないということです。
例えば、
demo.yml
---
jobs:
  demo:
    if: ${{ github.event.issue.pull_request }}
    runs-on: ubuntu-latest
    environment: production
    steps:
      - name: branch-deploy
        id: branch-deploy
        uses: github/[email protected]

      - name: Echo TEST Environment Variable
        run: echo ${{ vars.TEST }}
このようなGithub Actionsがあった場合、.deploy stagingを実行しても.deploy productionを指定しても、vars.TESTに入る環境変数はGithubのproduction環境のTEST変数です。Githubのstaging環境のTEST変数にアクセスする方法はありません。
この問題を解決するには2つの方法があります。
環境変数用の環境を作成する
1つ目は環境変数用の環境を別途用意する方法です。
この方法では、secretsのようなGithubの環境を事前に用意します。
その上で、そのsecretsの中にPRODUCTION_TEST・STAGING_TESTなどのBranch Deployモデルの環境名が付与された変数を設定します。
それらの変数を条件分岐毎に利用することで、Branch Deployモデルの中で環境変数とSecretを使います。
Branch Deployモデルの結果を次のjobに引き渡す
2つ目の方法は、Branch Deployの環境名をoutputとして出力し、それをGithubのenvironmentに渡すやり方です。
ソースコードは以下のようになります。
demo.yml
name: Demo

# The workflow to execute on is comments that are newly created
on:
  issue_comment:
    types: [created]

# Permissions needed for reacting and adding comments for IssueOps commands
permissions:
  pull-requests: write
  deployments: write
  contents: write
  checks: read

jobs:
  trigger:
    if: ${{ github.event.issue.pull_request }}
    runs-on: ubuntu-latest
    environment: production
    outputs:
      environment: ${{ steps.branch-deploy.outputs.environment }}
    steps:
      - name: branch-deploy
        id: branch-deploy
        uses: github/[email protected]
  result:
    needs: [trigger]
    runs-on: ubuntu-latest
    environment: ${{ needs.trigger.outputs.environment }}
    steps:
      - name: Env Test
        run: echo ${{ vars.TEST }}
triggerジョブで現在のBranch Deployの環境を取得し、resultジョブで実際の処理を行います。
こうすることで、resultジョブはBranch Deployで指定した環境名でジョブを実行するため、GithubのEnvironmentを利用することができます。
Branch DeployモデルのParameter
Branch Deployモデルを利用する際にPull RequestからWorkflowに対して自由に値を渡したくなることもあります。
そんな時はBranch DeployモデルのParameterを利用すると、自由にパラメーターを設定することができます。
param_separatorオプション
https://github.com/github/branch-deploy/blob/main/docs/parameters.md
上記公式ドキュメントのように、Github Branch Deployモデルでは、param_separatorオプションを利用することで自由にパラメータをWorkflowに引き渡すことができます。
demo.yml
steps:
  - name: branch-deploy
    id: branch-deploy
    uses: github/[email protected]
    with:
      environment_targets: staging-demo,production-demo
      param_separator: '|'
と指定した場合、|の後のパラメータをWorkflowに引き渡すことが可能です。
例えば.deploy staging-demo | aaa bbb cccというコマンドを実行した場合、paramsにはaaa bbb cccという値が入ります。
そして、その値をsteps.branch-deploy.outputs.paramsにてWorkflow上で取得できます。
Parameterを指定してWorkflowを実行する
実際にParameterを指定してWorkflowを実行します。
demo.yml
steps:
  - name: branch-deploy
    id: branch-deploy
    uses: github/[email protected]
    with:
      environment_targets: staging-demo,production-demo

  - name: example
    if: steps.branch-deploy.outputs.continue == 'true'
    run: |
      echo "params: ${{ steps.branch-deploy.outputs.params }}"
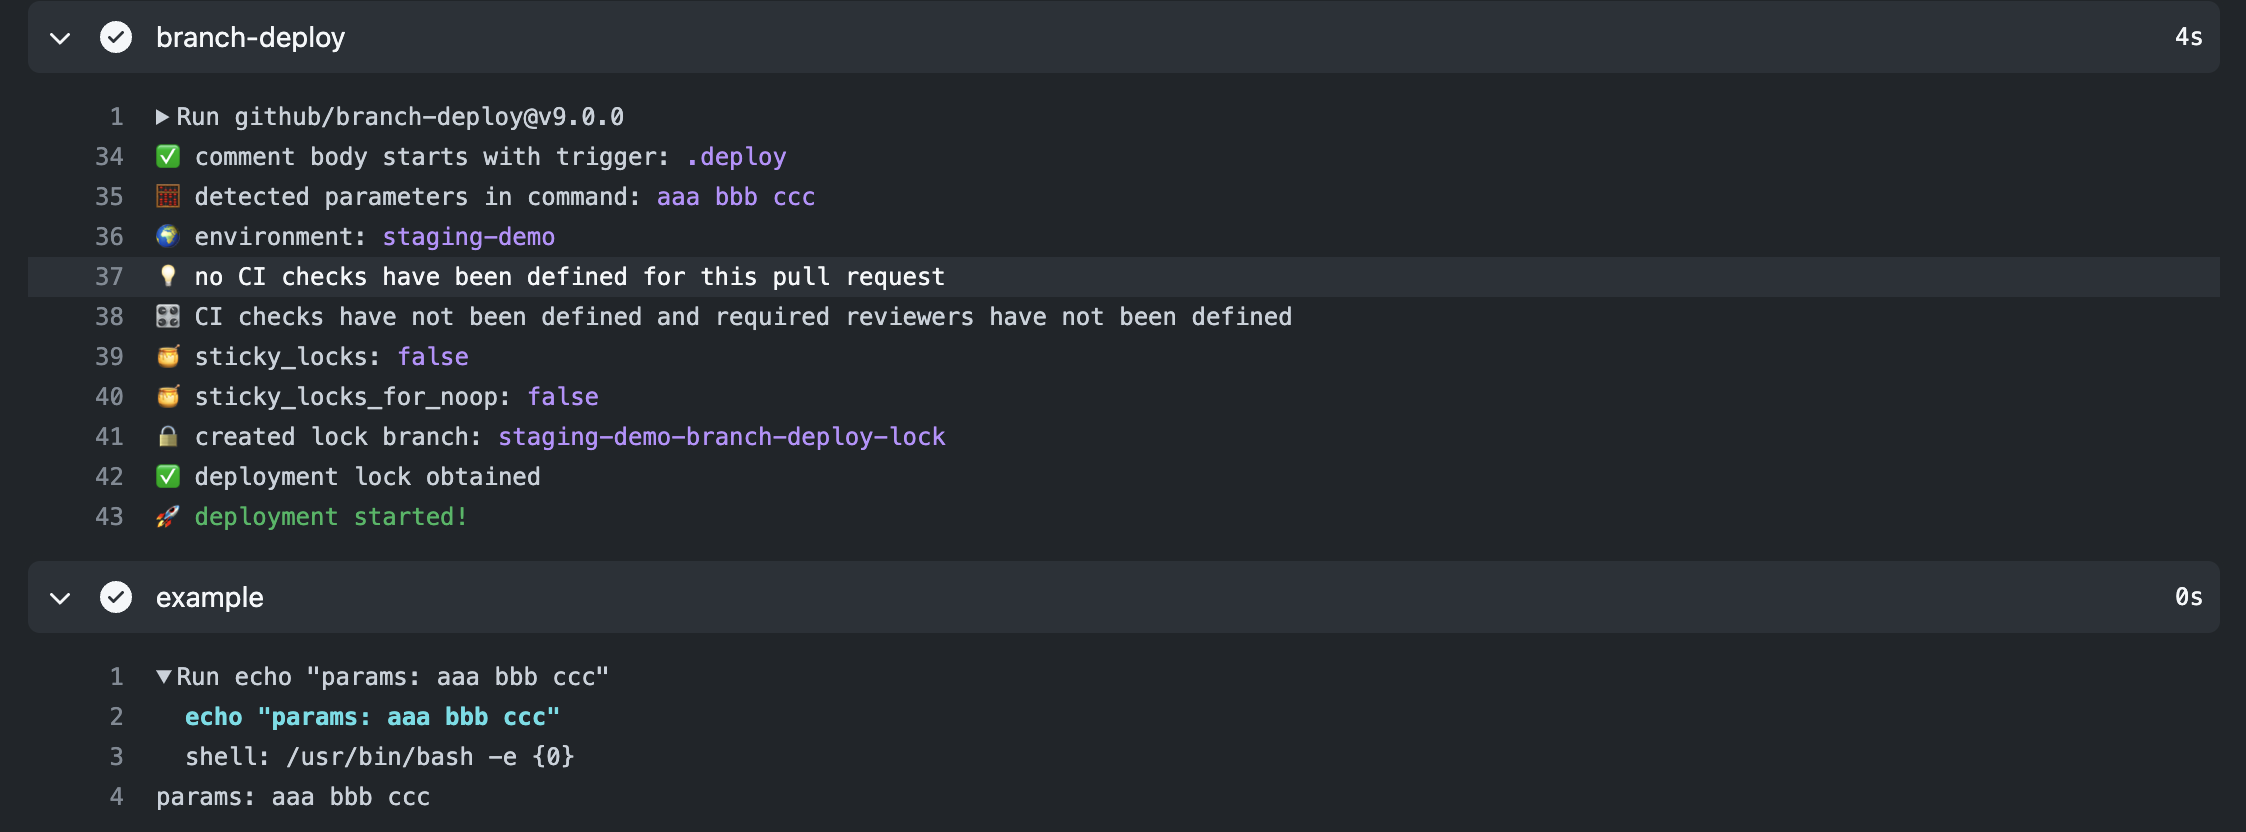
このように指定したパラメータをechoでlogに表示できるようにして、以下のようにPull Request上からコマンド実行します。
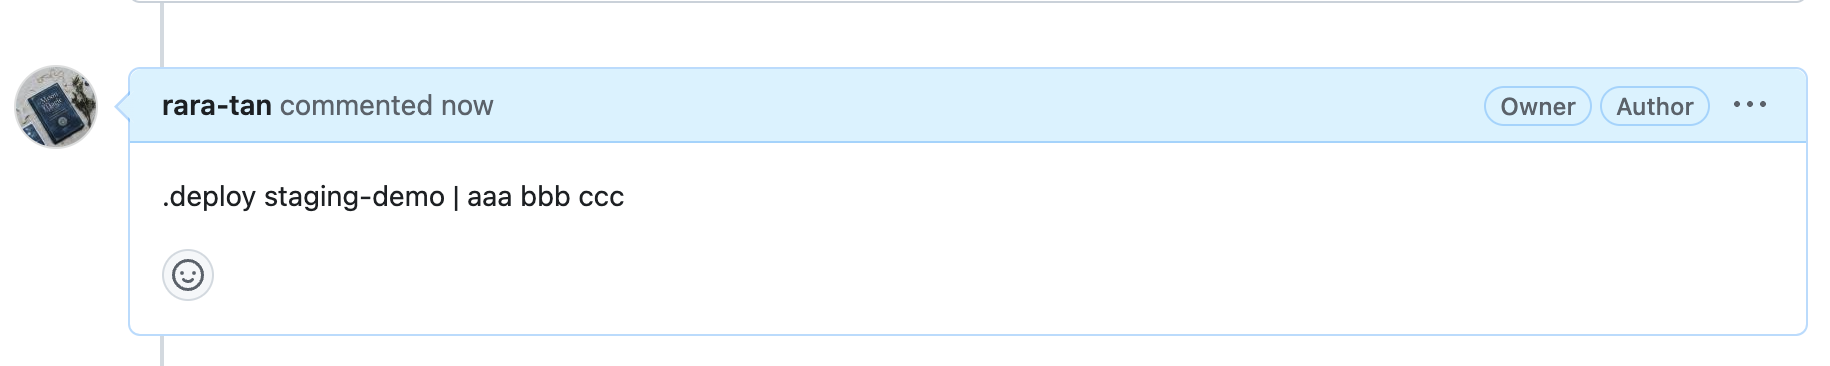
すると、Github Actions上のbranch-deployステップでは🧮 detected parameters in command: aaa bbb cccというパラメータを取得したことを示すログが出ています。
また、exmapleステップの結果では、指定した通りaaa bbb cccというパラメータのログが表示されています。
Key=Value形式でパラメータを指定する
パラメータの指定ができるようになったので、複数の種類のパラメータを指定する方法を紹介します。
例えば、CPU=4, MEMORY=2000といった具合にKey=Value形式で複数の種類のパラメータを指定したい場合
.deploy staging-demo | CPU=4,MEMORY=2000
といった具合にパラメータの中で,等のセパレータを用意します。
そのseparaterを目印にGithub Actions上で各パラメータを取得します。
demo.yml
- name: branch-deploy
  id: branch-deploy
  uses: github/[email protected]
  with:
    environment_targets: staging-demo,production-demo

- name: Parse Branch Deploy Parameter
  if: steps.branch-deploy.outputs.continue == 'true'
  id: parse-parameter
  run: |
    paramString="${{ steps.branch-deploy.outputs.params }}"
    IFS=', ' read -r -a pairs <<< "$paramString"
    for pair in "${pairs[@]}"
    do
      IFS='=' read -r key value <<< "$pair"
      echo "::set-output name=$key::$value"
    done

- name: CPU Value
  if: steps.branch-deploy.outputs.continue == 'true'
  run: echo ${{ steps.parse-parameter.outputs.CPU }}
- name: MEMORY Value
  if: steps.branch-deploy.outputs.continue == 'true'
  run: echo ${{ steps.parse-parameter.outputs.MEMORY }}
このようにYAMLファイルを設定すると、Parameterとして指定したCPUとMEMORYをそれぞれ取得できます。
試しに上記YAMLファイルで動作するGithub Actionsをコメントから実行します。

.deploy staging-demo | CPU=4,MEMORY=2000というコメントを追加して、Github Actionsを起動します。
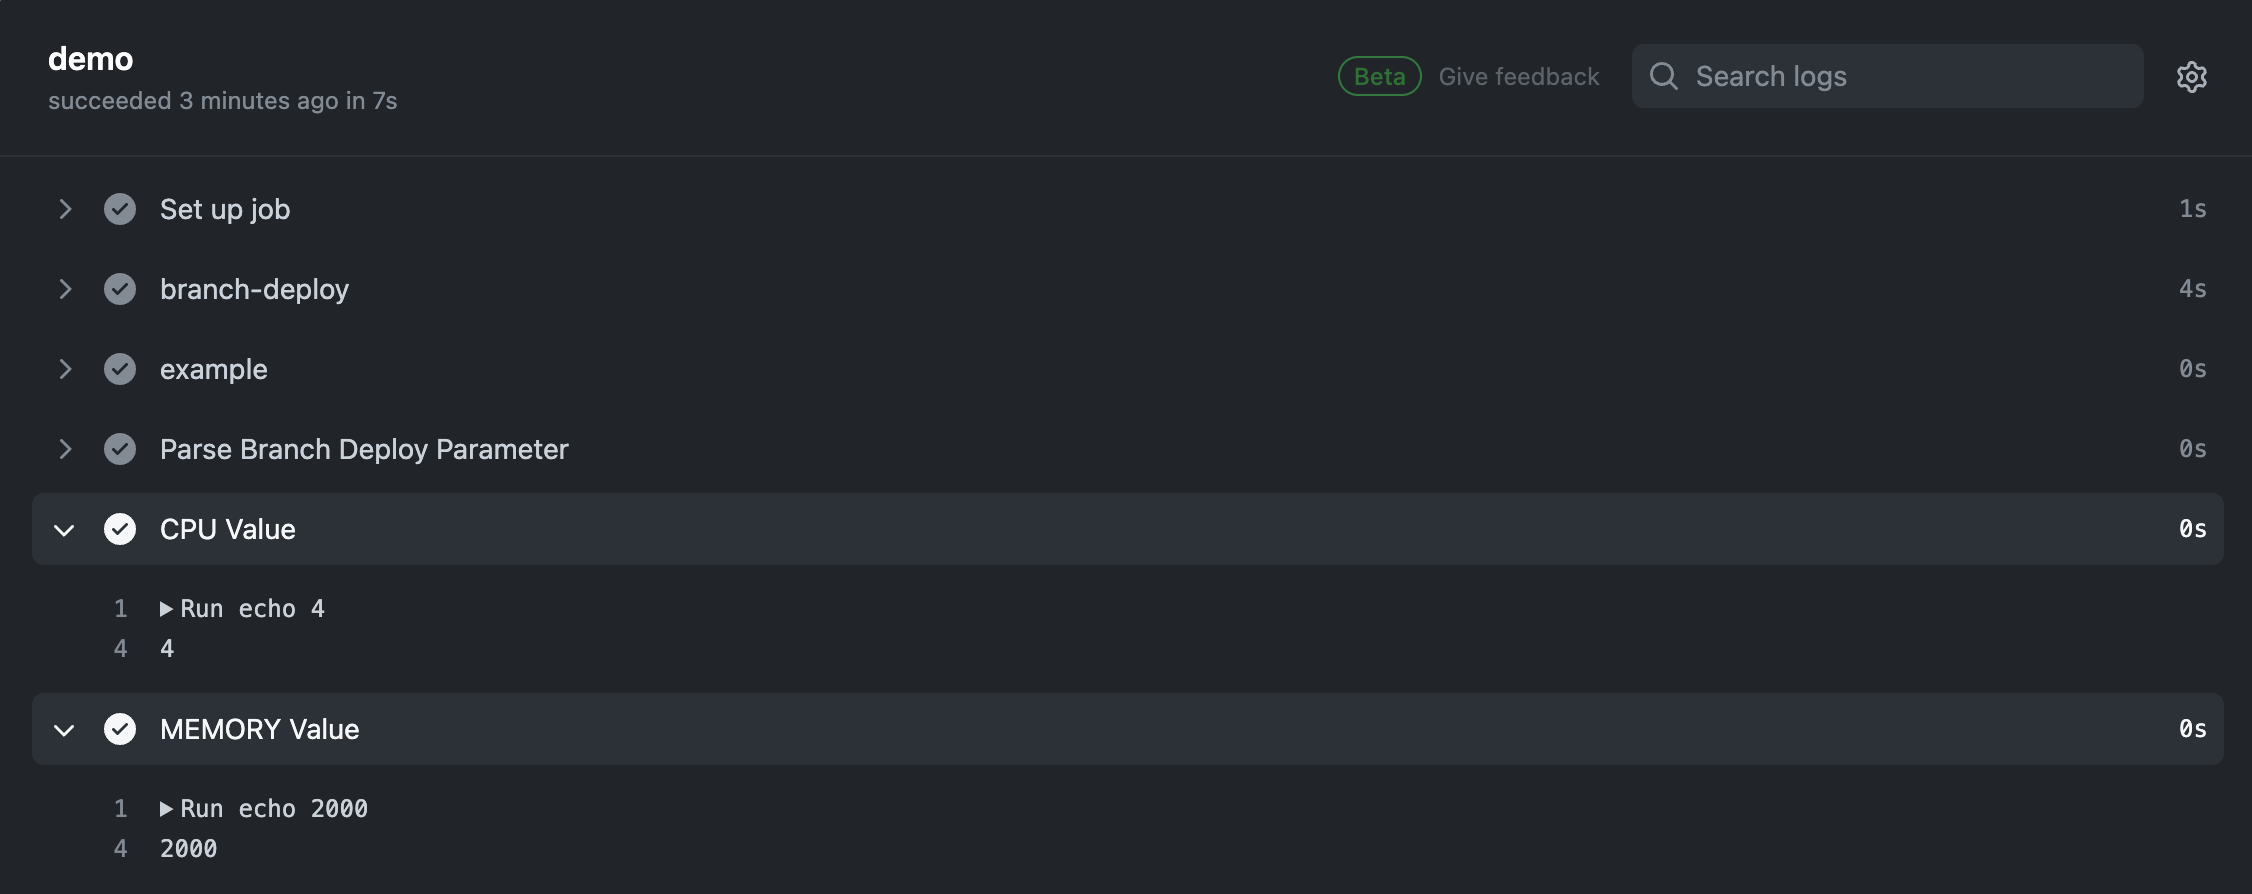
正常に動作すれば、上記のようにそれぞれのParameterを取得できます。
Parameterが存在しない場合StepをSkipする
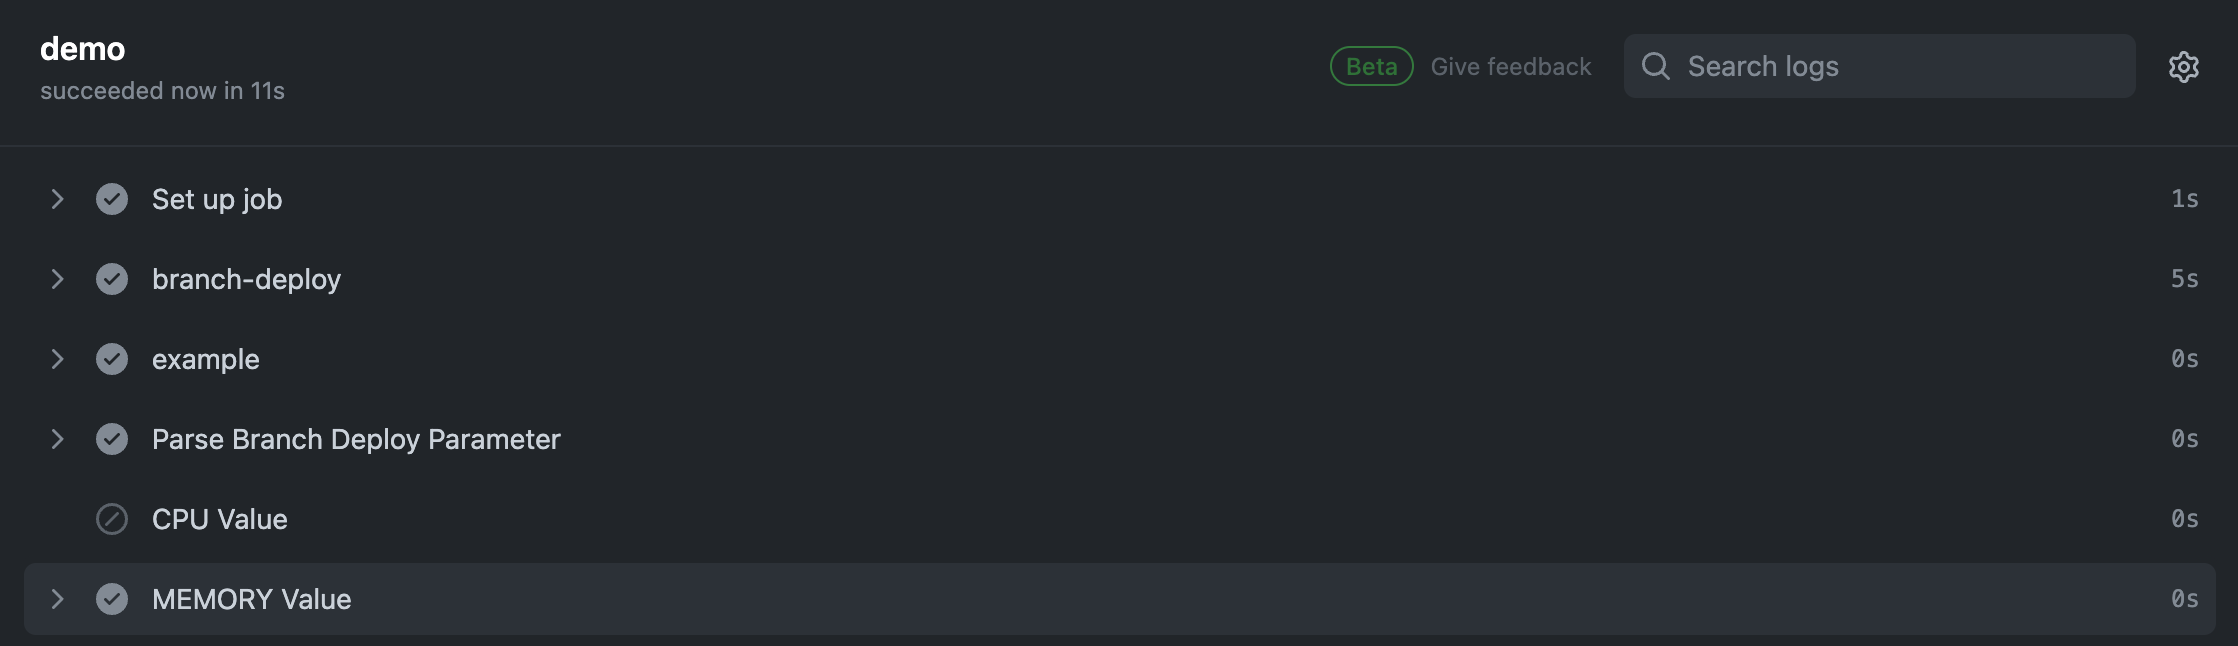
CPUとMEMORYを指定できるGithub Actionsを作成しましたが、片方しか指定しないこともあると思います。
値がない場合は、その値を使うStepをSkipすることも可能です。
demo.yml
- name: CPU Value
  if: ${{ steps.branch-deploy.outputs.continue == 'true' && steps.parse-parameter.outputs.CPU != '' }}
  run: echo ${{ steps.parse-parameter.outputs.CPU }}
このようにCPUパラメータがない場合はSKIPする処理をCPU ValueStepに追加して、メモリだけを指定した.deploy staging-demo | MEMORY=2000コメントをPRに追加します。

すると、以下のようにCPU ValueをSkipしたWorkflowが実行されます。
まとめ
GithubのBranch Deployモデルについて解説しました。
Merge Deployモデルの方が多く採用されている印象がありますが、Branch Deployモデルを採用することでCICDが正常動作をしたことを担保できるのでmainブランチを完全な状態に保つことができます。
TerraformのようなIaCツールを管理するGithub Repositoryととても相性がいいモデルですので、ぜひ、利用してみてください。